Easy2Patch v4.0
Easy2Patch v4.0
  • Infrastructure Documents
  • Overview
    • What is Easy2Patch?
    • Request a new 3rd Party Applications
    • FAQs
    • Road Map
    • Release Notes
    • Version Compare
    • Licensing
  • Planning
    • POC Requirements for Easy2Patch 3.1
    • POC Requirements for Easy2Patch 4.0 Web Edition
    • Supported Configurations
    • Windows Operating System Requirements
    • SQL Server Requirements
    • Other Requirements
    • Network Considerations
    • Antivirus Exclusion List for Easy2PatchV3
    • Design
      • Update & Application & Intune (Server Deployment)
      • Standalone WSUS Deployment
      • Standalone Intune Deployment
  • Deployment
    • Installing WSUS Console
    • Installing SCCM Admin Console
    • Installing IIS Component for Easy2Patch 4.0
    • Configuring Intune Application Registration
    • Getting Code-Signing Certificate
    • Installing Easy2Patch 3.1
      • Upgrading to Easy2Patch 3.1.10
      • Licensing Easy2Patch 3.1
    • Installing Easy2Patch 4.0
      • Upgrading Easy2Patch 4.0
      • Easy2Patch Backup & Restore
      • Licensing Easy2Patch 4.0
  • Configuring
    • SSL Configuration in WSUS for 3rd Party Update
    • Configuring ConfigMgr for 3rd Party Updates
    • Easy2Patch 3.1 Settings
      • General
        • Certificate Management
        • Backup Settings
          • Restore Easy2Patch 3.x
        • General Settings
        • Application Deployment
        • Intune Deployment
        • Maintenance
      • Notification
        • E-Mail
        • Telegram
          • Creating a Telegram Bot
          • Telegram Chat ID
      • SCCM / WSUS / INTUNE
        • WSUS Settings
        • SCCM Settings
        • Database Settings
        • Intune Settings
      • Proxy
    • Easy2Patch 4.0 Settings
      • Migrate from Easy2Patch 3.x
      • General Settings
        • General
        • Identity
          • Active Directory
          • EntraID
            • Required Permissions for EntraID
        • Proxy
        • Log
        • Maintenance
        • Login
      • Deployment Settings
        • Process Conflict
        • Update
        • Application Deployment
        • Intune Deployment
        • Defender
      • Connection Settings
        • Database
        • SCCM
        • WSUS
        • Intune
      • Managements
        • Role
        • License
        • Certificate Management
      • Alert Settings
        • Notification
          • E-Mail
          • Telegram
            • Creating a Telegram Bot
            • Telegram Chat ID
            • Telegram Setting
        • Alerts
        • Recipients
  • Managing Easy2Patch
    • Easy2Patch 3.1
      • Update
      • Application Deployment
      • Intune Update
      • Intune Application
      • License Management
    • Easy2Patch 4.0
      • Dashboard
        • WSUS
        • SCCM
        • Intune
      • Update
        • Application Custom Settings
        • WSUS Maintenance
        • Side Menu
      • Application
        • Application Deployment Right Click Menu
        • Application Custom Settings
        • SCCM Maintenance
        • Side Menu
      • Intune Update
        • Intune Update Right Click Menu
        • Application Custom Settings
        • Intune Maintenance
        • Side Menu
      • Intune Application
        • Intune Application Right Click Menu
        • Application Custom Settings
        • Intune Maintenance
        • Side Menu
      • CVE List
      • Schedule
      • Reporting
        • Update Status
  • Troubleshooting
    • Schema files not found!
    • Failed to sign package
    • Fixing 500.19 web.config error
    • Securing Windows Server
Powered by GitBook
On this page
  • 3rd Party settings on ConfigMgr
  • Client Settings

Was this helpful?

  1. Configuring

Configuring ConfigMgr for 3rd Party Updates

Scope: Easy2Patch (All Versions)

PreviousSSL Configuration in WSUS for 3rd Party UpdateNextEasy2Patch 3.1 Settings

Last updated 10 months ago

Was this helpful?

3rd Party settings on ConfigMgr

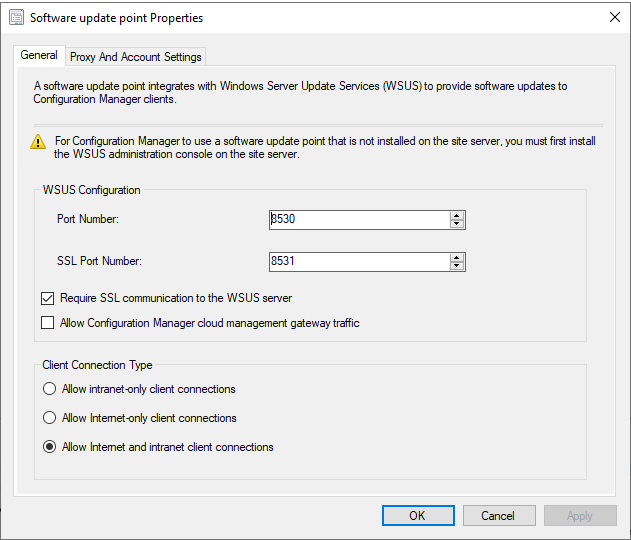
Go to Administration\Overview\Site Configuration\Servers and Site System Roles node and enter Properties screen with right click on Software Update Point role, then select "Require SSL communication to the WSUS server" check box and OK button.

To require SSL communication to the WSUS server for SCCM 3rd party updates, you can follow these steps:

  1. Open the Configuration Manager console and go to Administration > Site Configuration > Servers and Site System Roles.

  2. Select server that contains Software Update Point role.

  3. In the site system roles pane select Software Update Point role and click properties in right click menu.

  4. Select the site that you want to configure, and click on "Configure Site Components" in the ribbon.

  5. Go to the "General" tab.

  6. Check the box that says "Require SSL communication to the WSUS server".

  7. Click "OK" to save the changes.

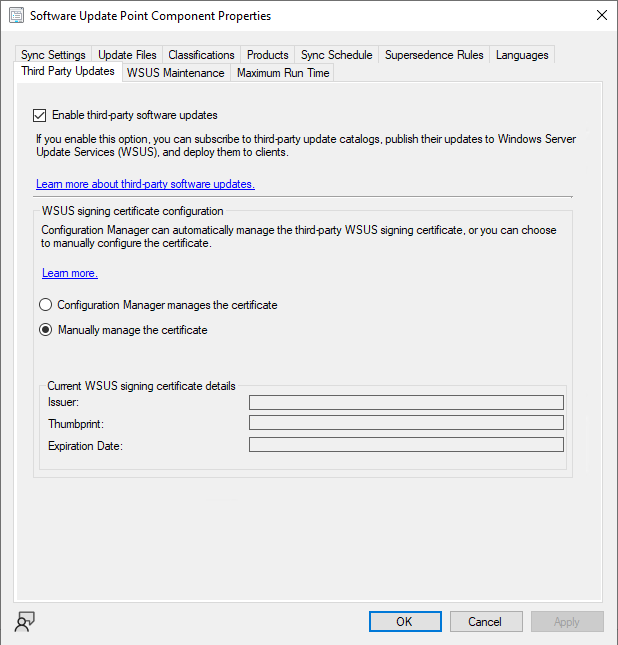
To configure other settings for 3rd party updates in SCCM, you can follow these additional steps:

  1. Open the Configuration Manager console and go to Administration > Site Configuration > Sites.

  2. Select the site that you want to configure, and click on "Configure Site Components" in the ribbon.

  3. Click on "Software Update Point", go to the "Third Party Updates" tab.

  4. Check the box that says "Enable third party updates".

  5. In the same screen select "Manually manage the certificate" option.

  6. Click "OK" to save the changes.

You can also configure additional settings for individual third-party update sources by selecting the "Third-Party Update Catalogs" node in the Configuration Manager console and then selecting the catalog that you want to configure. From there, you can configure settings such as proxy server settings, download location, and update categories.
Client Settings

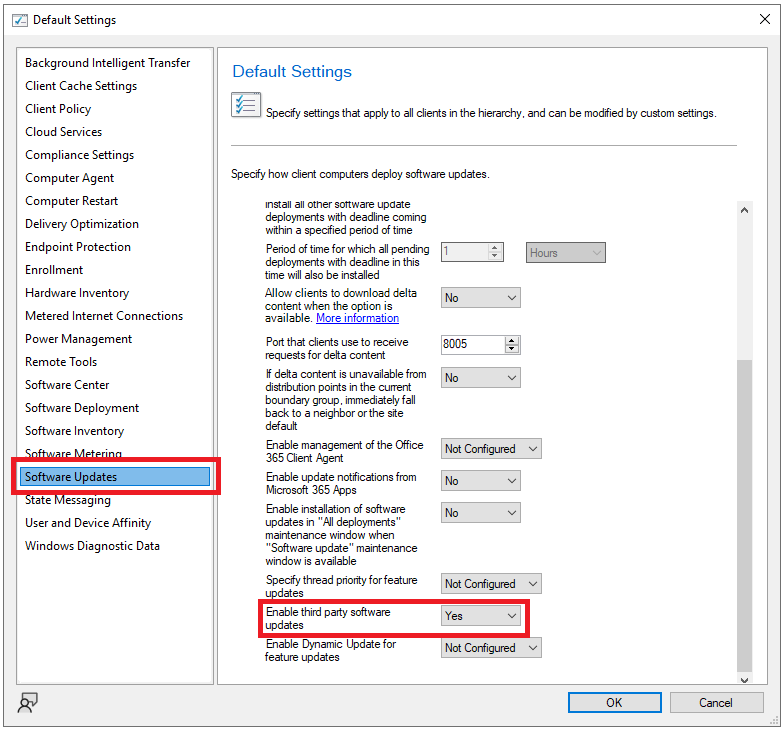
Finally enable 3rd Party updates on clients. For this go to "Client settings" node on Administration pane.

  1. On the client settings screen, right-click on "Default Client Settings" or the appropriate client update policy and the properties screen opens.

  2. Software updates screen is displayed. On this screen, "Enable third party software updates" is selected as "Yes".

  3. Click OK to save the settings.