# Infrastructure Documents

| Overview           | Planning                              | Deployment                                  |
| ------------------ | ------------------------------------- | ------------------------------------------- |
| What is Easy2Patch | Supported Configurations              | Installing WSUS Console                     |
| FAQs               | Windows Operating System Requirements | Installing SCCM Admin Console               |
| Road Map           | Other Requirements                    | Configuring Intune Application Registration |
| Licensing          | Network Considerations                | Getting Code-Signing Certificate            |
|                    | Design                                | Installing Easy2Patch                       |

<figure><img src="/files/T1ckLhxtLA2uhoiRSkhC" alt=""><figcaption><p><a href="https://www.easy2patch.com/premium-trial">https://www.easy2patch.com/premium-trial</a></p></figcaption></figure>

{% embed url="<https://forms.office.com/r/5eqBamYaAN>" %}


# Overview

Scope: Easy2Patch 3.0

<figure><img src="/files/T1ckLhxtLA2uhoiRSkhC" alt=""><figcaption><p><a href="https://www.easy2patch.com/premium-trial">https://www.easy2patch.com/premium-trial</a></p></figcaption></figure>


# What is Easy2Patch?

Scope: Easy2Patch (All Versions)

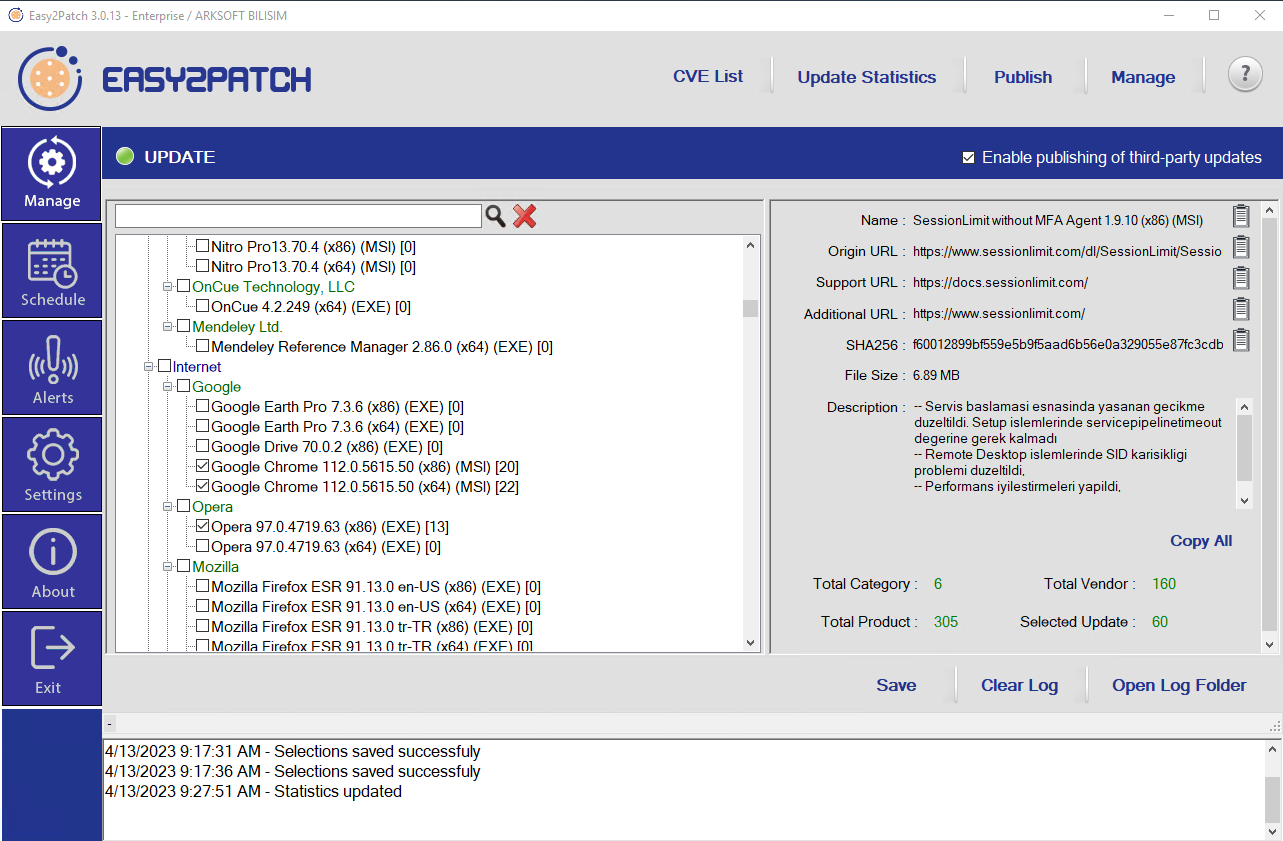
Easy2Patch provides automatic and centralized updating of 3rd party software running on computers within the corporate network.

Easy2Patch can integrate with Microsoft's WSUS, SCCM and Intune systems.

## Introduction

Use Easy2Patch to help you with the following security activities:

* It provides a catalog that can fix the security and stability problems of over 500 software.
* It provides automatic updating without leaving it to the user.
* Provides information on which vulnerability (CVE) has been fixed.
* Ensure that the correct application is downloaded and installed from the correct source.

Easy2Patch helps keep the system secure and/or stable through performing the above mentioned operations.

* The end user does not need to be an administrator on the computer they use,&#x20;
* There is no need to run an additional agent on the endpoint computer,&#x20;
* With Intune, all computers, including the internet environment, can be updated centrally.

<figure><img src="/files/T1ckLhxtLA2uhoiRSkhC" alt=""><figcaption><p><a href="https://www.easy2patch.com/premium-trial">https://www.easy2patch.com/premium-trial</a></p></figcaption></figure>

## What's New

The following features have been introduced in Easy2Patch 4.0 version.

* New enhanced web base user interface,
* New dashboard screens and reports,
* Role base management,
* No need to install service on Easy2Patch Server,
* EntraID login,
* 2FA and captcha secured login in Portal,
* Administrative log panel with SignalR
* Enhanced CVE panel,


# Request a new 3rd Party Applications

While you can add your own applications to the Easy2Patch with "**Custom Application Injection**", you can also request that the Easy2Patch team add new applications.

You can request a new application using the Easy2Patch [Support Channel - support@easy2patch.com](mailto:support@easy2patch.com)


# FAQs

Scope: Easy2Patch (All Versions)

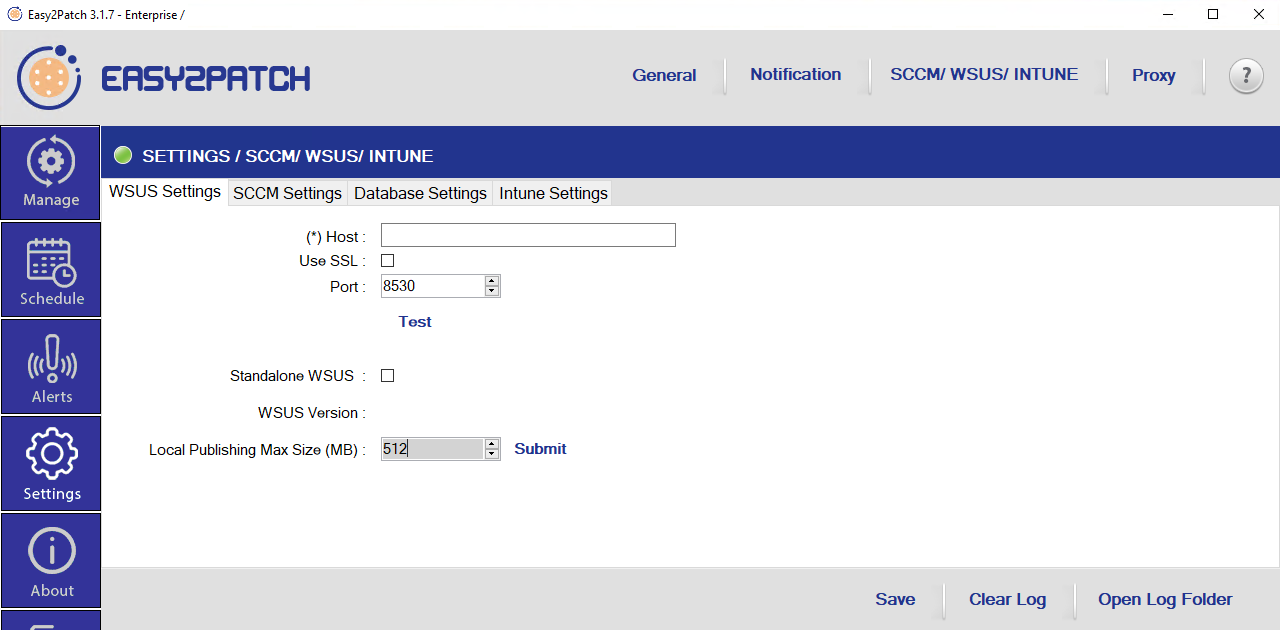
### Some settings are missing in SCCM Settings tab

The SCCM/WSUS/Intune tab under Settings is license sensitive. The tabs on this screen are visible  or hidden according to the license and usage. The following describes the visibility and functionality of tabs by license and usage scenarios.

1. **Free License**; In this licensing model, only the WSUS tab is visible and no configuration other than the Standalone WSUS configuration can be used. None of the SCCM settings are visible and functional on these screens.
2. **Standard License**; If you have a Standard license, only the settings for WSUS will be visible on the screen. In this licensing model, Application Deployment via SCCM and Intune-related settings are not visible and non-functional.
3. **Advanced License**; If you have a Advanced license, only the settings for WSUS and SCCM Application Deployment will be visible on the screen. In this licensing model, Intune-related settings are not visible and non-functional.
4. **SCCM Console**; If the SCCM console is not installed on the system where Easy2Patch is installed, the SCCM related settings will appear and will not be functional. The console must be loaded and the Easy2patchSvc service and, if open, the Easy2Patch screen must be restarted.

### SCCM Collection and/or DP Lists are empty

**SCCM DB Settings**; The Distribution Point and Collection list on the SCCM Settings screen will be empty if the SCCM database settings have not been made. The user account configured on the System account or SCCM screen must have read rights defined in the relevant database.

Following SQL batch running on ConfigMgr database to give permission for service account of user who use Easy2Patch and Easy2PatchSvc service account.

{% code title="E2PPermissions.sql" %}

```sql
-- Replace the DB name that says E2P with the appropriate name in your environment
USE [CM_E2P]
GO

-- {Domain\Username | Domain\ServerName$} replace it with the appropriate user account
DECLARE @UserName nvarchar(128) = 'Domain\Username'
  --DECLARE @UserName nvarchar(128) = 'Domain\ServerName$'
  
DECLARE @QuotedUserToGrant nvarchar(128) = QUOTENAME(@UserName);

IF NOT EXISTS(SELECT principal_id FROM sys.server_principals WHERE name = @UserName) BEGIN
DECLARE @LoginSQL as varchar(500);
SET @LoginSQL = 'CREATE LOGIN '+ @QuotedUserToGrant + ' FROM WINDOWS';
EXEC (@LoginSQL);
END

IF NOT EXISTS(SELECT principal_id FROM sys.database_principals WHERE name = @UserName) BEGIN
DECLARE @UserSQL as varchar(500);
SET @UserSQL = 'CREATE USER ' + @QuotedUserToGrant + ' FOR LOGIN ' + @QuotedUserToGrant;
EXEC (@UserSQL);
END

DECLARE @PermissionsSQL as varchar(500);
SET @PermissionsSQL = 'GRANT SELECT ON [dbo].[v_FullCollectionMembership] TO ' + @QuotedUserToGrant +
' GRANT SELECT ON [dbo].[v_GS_ADD_REMOVE_PROGRAMS] TO ' + @QuotedUserToGrant +
' GRANT SELECT ON [dbo].[v_Collection] TO ' + @QuotedUserToGrant +
' GRANT SELECT ON [dbo].[v_GS_ADD_REMOVE_PROGRAMS_64] TO ' + @QuotedUserToGrant +
' GRANT SELECT ON [dbo].[v_Add_Remove_Programs] TO ' + @QuotedUserToGrant +
' GRANT SELECT ON [dbo].[v_GS_INSTALLED_SOFTWARE] TO ' + @QuotedUserToGrant
EXEC (@PermissionsSQL);

```

{% endcode %}

### SCCM rights for Administrator and Service Account

Publishing updates on SCCM, triggering synchronization, creating applicaiton automatically with Easy2Patch a user account to be created on Active Directory is required for SCCM jobs. This user account needs the following SCCM privileges.

* **Application:** Read, Modify, Delete, Set Security Scope, Create, Move Object, Modify Folder
* **Software Updates:** Read, Modify
* **Distribution Point:** Read, Copy to Distribution Point
* **Distribution Point Group:** Read, Copy to Distribution Point Group
* **Folder Class:** Read, Modify, Create
* **Security Scopes:** Read
* **Site:** Read


# Road Map

Scope: Easy2Patch (All Versions)

<figure><img src="/files/T1ckLhxtLA2uhoiRSkhC" alt=""><figcaption><p><a href="https://www.easy2patch.com/premium-trial">https://www.easy2patch.com/premium-trial</a></p></figcaption></figure>

<table><thead><tr><th width="249.33333333333331">Sürüm</th><th>Tarih</th><th>Açıklama</th></tr></thead><tbody><tr><td>Easy2Patch 1.0</td><td>20/05/2022</td><td>Integration with WSUS for 3rd party updates</td></tr><tr><td>Easy2Patch 2.0</td><td>25/06/2022</td><td>In addition to version 1.0,  SCCM integration for 3rd party updates and application deployment have been added.</td></tr><tr><td>Easy2Patch 3.0</td><td>01/04/2023</td><td>In addition to version 2.0, Intune integration and Teams messaging system have been added.</td></tr><tr><td>Easy2Patch 3.1</td><td>01/07/2023</td><td><p>Critical Patch Management with Defender Integration</p><p>Some minor features will add.</p></td></tr><tr><td>Easy2Patch 4.0</td><td>01/05/2024</td><td>Easy2Patch web version will be released.</td></tr></tbody></table>


# Release Notes

#### **Easy2Patch 4.0.5 - Release Notes (**&#x200E;Thursday, ‎May ‎15, ‎2025 8:21:46 AM)

* **Resolved Duplicate Deployment Issues in SCCM Tracking**\
  Addressed an issue where applications were being resent due to corrupted or faulty SCCM tracking scenarios. This ensures more accurate deployment tracking and prevents redundant deployments.
* **Silent Install Parameter Inheritance Resolved**

  A long-standing issue where the *silent installation parameter* was not correctly inherited by newly published packages has now been resolved.

  * All packages published via Easy2Patch 4.0 will now **retain the defined silent install arguments** consistently across updates and new versions.
  * This fix ensures more **reliable unattended deployments** in both SCCM and Intune environments.
* **Major Performance Improvements**  \
  Significant performance optimizations have been implemented in the core update engine:
  * Faster metadata processing and publishing workflows
  * Improved responsiveness in large catalogs with hundreds of products
  * Reduced load times and memory usage in the UI and backend services

#### **Easy2Patch 3.1.14 - Release Notes (**&#x200E;Tuesday, ‎May ‎13, ‎2025 2:36:55 PM)

* **Resolved Duplicate Deployment Issues in SCCM Tracking**\
  Addressed an issue where applications were being resent due to corrupted or faulty SCCM tracking scenarios. This ensures more accurate deployment tracking and prevents redundant deployments.

#### **Easy2Patch 3.1.13 - Release Notes (**&#x200E;Monday, ‎May ‎5, ‎2025 6:51:38 PM)

**Improvements and Fixes**

* **Enhanced Auto-Update Configuration**\
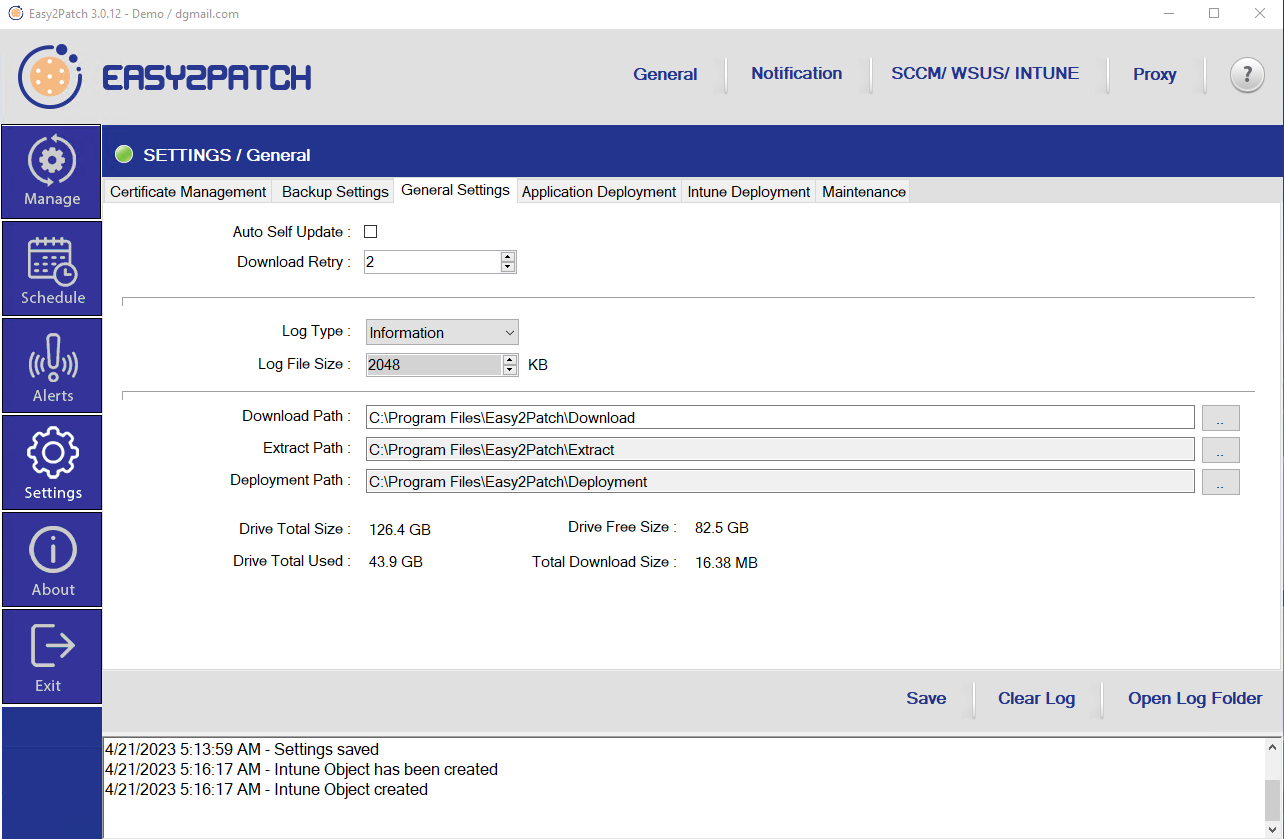
  The automatic update functionality has been redesigned based on the Easy2Patch MSI package. After updating to this version, users can optionally enable the **Auto Self Update** feature from `Settings > General Settings`. When activated, Easy2Patch will automatically update itself when a new version is released.
* **Fixed Random SUSDB Update Prompts**\
  Intermittent warnings related to "update failed" in SUSDB have been resolved. These were caused by database access delays and bottlenecks. Performance optimizations have been implemented to eliminate this issue and improve overall database responsiveness.


# Version Compare

## **Easy2Patch 4.0 Enhancements**

## **Web-Based Management Interface**

Easy2Patch 4.0 comes with a modern web interface, offering a user-friendly experience and enabling centralized control of update and patch management operations.

### **Advanced Reporting and Dashboards**

The new version includes enriched dashboards and detailed reporting features, making it easier to monitor and analyze patching activities effectively.

### **Active Directory and EntraID Integration**

Easy2Patch 4.0 supports integration with both Active Directory and EntraID (formerly Azure AD), allowing for flexible identity and access management across platforms. It also includes role-based access control.

### **Improved Performance and User Experience**

This version features performance optimizations and enhanced usability, resulting in a faster and more seamless experience.

***

## **Easy2Patch 3.x Features**

### **Traditional Desktop Application**

Easy2Patch 3.x is based on a desktop interface, without support for web-based administration.

### **Limited Reporting Capabilities**

Reporting and analytics in the previous version are limited and mostly dependent on SCCM-integrated reports.

### Role-Based Management

There is no support for modern identity providers like EntraID. Role-based access control is also not available.

***

<table><thead><tr><th width="225">Feature</th><th width="205">Easy2Patch 3.1</th><th width="349">Easy2Patch 4.0</th></tr></thead><tbody><tr><td>Management Interface</td><td>Traditional desktop application</td><td>Modern web-based interface</td></tr><tr><td>Reporting Capabilities</td><td>Limited to SCCM-based reports</td><td>Advanced dashboards and detailed reporting</td></tr><tr><td>Directory Integration</td><td>❌</td><td>Supports both Active Directory and EntraID (Azure AD)</td></tr><tr><td>Role-Based Access Control</td><td>❌</td><td>Included – allows granular role assignment</td></tr><tr><td>Performance and User Experience</td><td>Basic usability</td><td>Optimized performance and seamless user experience</td></tr><tr><td>Auto Update</td><td>✅</td><td>❌</td></tr></tbody></table>


# Licensing

Scope: Easy2Patch (All Versions)

## Online Licensing

Easy2Patch software works with online license check at <https://license.arksoft.com.tr>. With Online Licensing, software updates and license information can be tracked online, and Easy2Patch self updates can be made automatically. In addition, the system will automatically continue to work with the new license in license renewals and upgrades.

### Demo License

WSUS, SCCM and Intune integrations can be used in the 30-day demo version. All functions are available for 30 days without any restrictions.

### Standard License

Standard version users can use Easy2Patch only with WSUS integration. Updates are published to the WSUS environment. If SCCM integrated with WSUS is used, it will be possible to manage updates via SCCM independently of Easy2Patch licensing.

### Advanced License

In addition to the standard license, the applications in the catalog can be published for application distribution via SCCM. With the determination of distribution points, requirements and collections, end-to-end automatic application update and distribution capabilities are gained.

### Enterprise License

In addition to the Advanced license, Easy2Patch can work integrated with Intune. Apps can be submitted in Intune as an update or app distribution format. Single and multiple deletion and sending operations can be performed. Automatic assignment can be made.


# Planning

Scope: Easy2Patch 3.0


# POC Requirements for Easy2Patch 3.1

Scope: SessionLimit 3.1

## Downloads

* [.Net Framework 4.7.2](https://download.microsoft.com/download/f/3/a/f3a6af84-da23-40a5-8d1c-49cc10c8e76f/NDP472-KB4054530-x86-x64-AllOS-ENU.exe). (Available for current Windows Server versions, older versions may require download.)
* For license control, TCP443 access must be provided to <https://license.arksoft.com.tr.> For license, please contact <sales@arksoft.com.tr>.
* Latest Easy2Patch Server Setup: [Download ](https://dl.easy2patch.com/dl/arksoft/easy2patch/Easy2Patch.msi)Easy2Patch 3.1 Package.

<table><thead><tr><th width="249">File Name</th><th>Version</th><th>Hash (SHA2)</th><th>Digital Signature</th></tr></thead><tbody><tr><td><a href="https://dl.easy2patch.com/dl/arksoft/easy2patch/Easy2Patch.msi">Easy2Patch.msi</a></td><td>3.1.14</td><td>1983A18C179749EB146EC59080ACEF3DCFAF1DC361B2EB8F38AD11FACAD44ED6</td><td>‎‎Tuesday, ‎May ‎13, ‎2025 2:36:55 PM</td></tr></tbody></table>

## Hardware Requirements

* RAM: At least 16GB, recommended 12GB (Reserved/Fixed)
* CPU: At least 2, recommended 4 vCPU
* Disk: 100GB OS (More disk space may be required depending on the size of the updates to be downloaded)
* Operating System: Windows Server 2016/2019/2022 - Standard/DataCenter&#x20;

## Network Requirements

* The LDAP / LDAPS - TCP 389 / TCP 636 ports must be opened from the Easy2Patch Server to the Domain Controller servers.&#x20;
* The TCP 8530/8531 or TCP 80/443 ports must be opened from Easy2Patch Server to WSUS Server.
* The RPC (High Ports) ports must be opened from Easy2Patch Server to Configuration Manager Site Server.
* TCP 80/443 ports must be opened from Easy2Patch Server to Intune Platform for enterprise licensing.
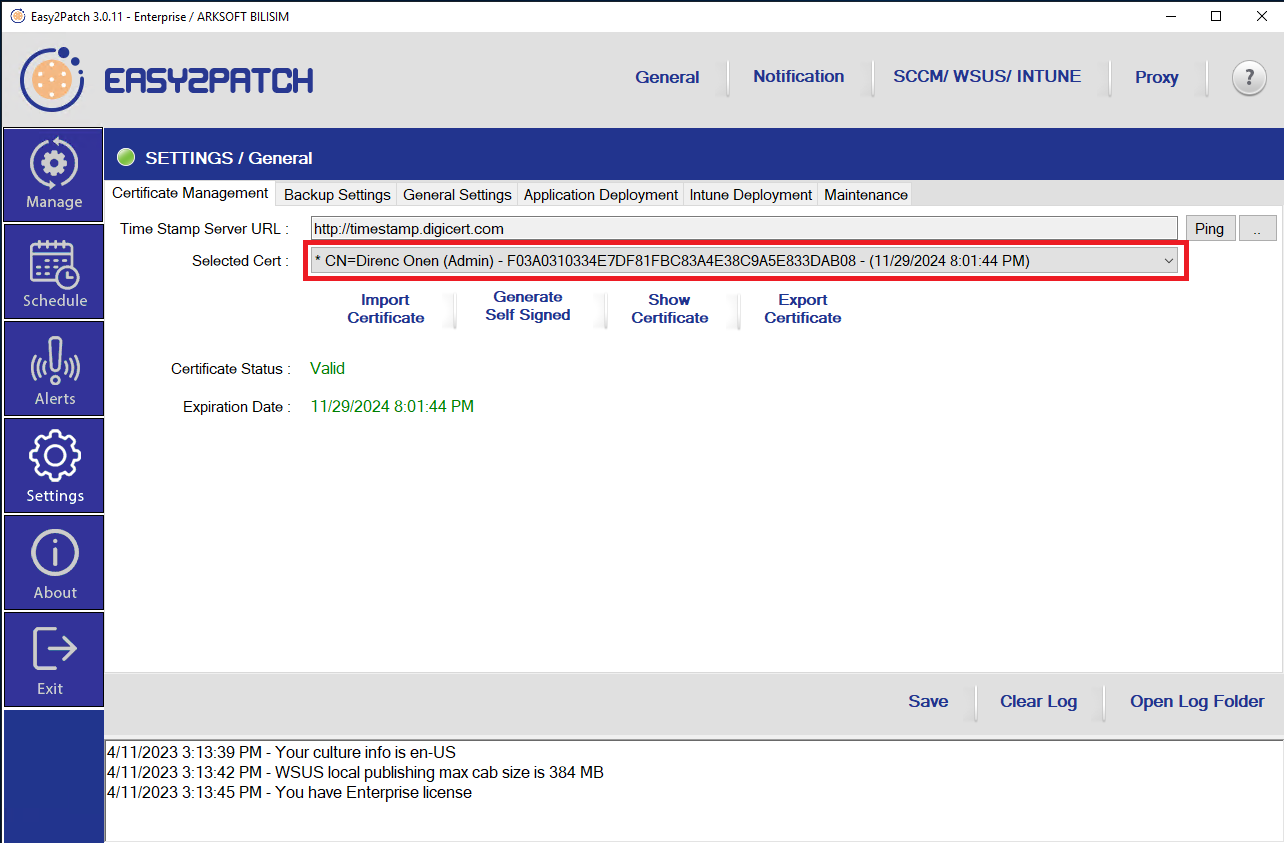
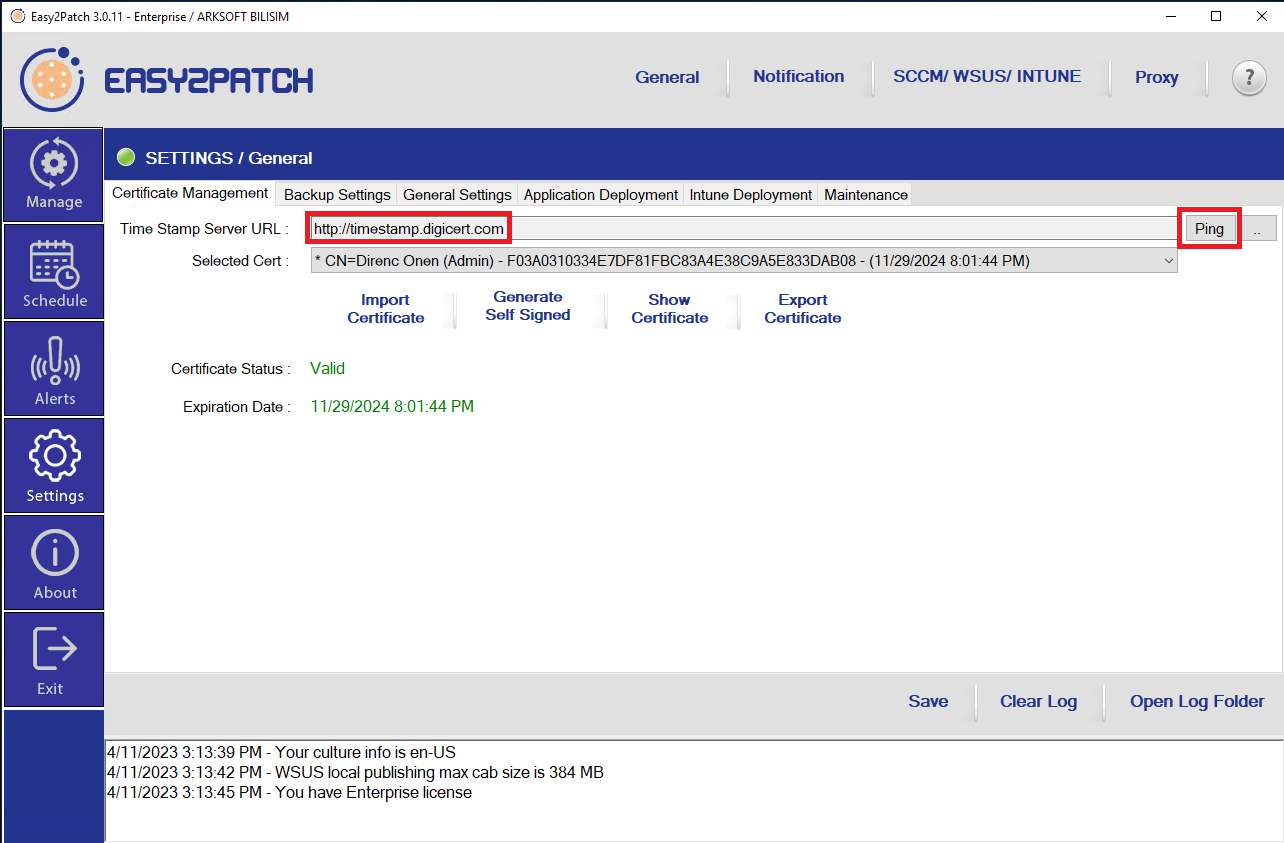
* The computer with SCCM Site Server, WSUS and Easy2Patch installed must have access to the selected timestamp address, (default is <http://timestamp.digicert.com> (TCP:80)).
* The server must be a member of the domain.


# POC Requirements for Easy2Patch 4.0 Web Edition

Scope: SessionLimit 4.0

## Downloads

* Latest ASP.NET Core Runtime 8.x: 8.0 [Hosting Bundle](https://builds.dotnet.microsoft.com/dotnet/aspnetcore/Runtime/8.0.21/dotnet-hosting-8.0.21-win.exe)
* [.Net Framework 4.7.2](https://download.microsoft.com/download/f/3/a/f3a6af84-da23-40a5-8d1c-49cc10c8e76f/NDP472-KB4054530-x86-x64-AllOS-ENU.exe) for ConfigMgr application. (Available for current Windows Server versions, older versions may require download.)
* For license control, TCP443 access must be provided to <https://license.arksoft.com.tr.> For license, please contact <sales@arksoft.com.tr>.
* Latest Easy2Patch Server Setup: [Download ](https://dl.easy2patch.com/dl/arksoft/easy2patch/4.0.8/Easy2PatchWE-4.0.8.1003.msi)Easy2Patch for Web 4.0.8 Package.
* If SCCM's SQL server will not be used, SQL Server Express version must be installed for the Easy2Patch database. You can download web installer of [SQL Server 2022 Express Edition](https://aka.ms/sqlexpress).

<table><thead><tr><th width="249">File Name</th><th>Version</th><th>Hash (SHA2)</th><th>Digital Signature</th></tr></thead><tbody><tr><td><a href="https://dl.easy2patch.com/dl/arksoft/easy2patch/4.0.8/Easy2PatchWE-4.0.8.1003.msi">Easy2PatchWE40.msi</a></td><td>4.0.8</td><td>AAAD82FD121E8D760C073D1618F13F552AFD27F6F78D0126C72F3142C8C11516</td><td>‎Thursday, ‎November ‎13, ‎2025 8:29:30 AM</td></tr></tbody></table>

## Hardware Requirements

* RAM: At least 16GB, recommended 12GB (Reserved/Fixed)
* CPU: At least 2, recommended 4 vCPU
* Disk: 100GB OS
* Operating System: Windows Server 2016/2019/2022 - Standard/DataCenter&#x20;

## Network Requirements

* The TCP 80/443 port must be opened from the Client and Servers to the Easy2Patch Portal page.
* The LDAP / LDAPS - TCP 389 / TCP 636 ports must be opened from the Easy2Patch Server to the Domain Controller servers.&#x20;
* The TCP 8530/8531 or TCP 80/443 ports must be opened from Easy2Patch Server to WSUS Server.
* The RPC (High Ports) ports must be opened from Easy2Patch Server to Configuration Manager Site Server.
* TCP 80/443 ports must be opened from Easy2Patch Server to Intune Platform for enterprise licensing.
* The server must be a member of the domain.

## Other Operating System Requirements

* According to the installation method, if Easy2Patch ; (Link will be provided in the installation guide) will be managed with a service account, an account that is a member of the “Domain Users” group is required to run the service on AD (must have local admin authority on the machine).
* If it will be managed with GMSA, a GMSA account must be created and the account must be checked.
* If it will be managed with a built-in account, no preliminary settings are required.&#x20;
* A Web Server certificate containing the FQDN to be obtained from the local CA server is required. Although it is not recommended at the POC stage, the certificate step can be skipped.&#x20;
* It is recommended that the regional settings of the server where the installation will be performed should always be “United States”.&#x20;


# Supported Configurations

Scope: Easy2Patch 4.0

Easy2Patch makes use of your servers and network configurations.&#x20;

This document can help you identify key configurations, requirements, and limitations. Use it to plan, deploy, and maintain a functional Easy2Patch deployment.

Products that are beyond their support lifecycle aren't supported for use with Easy2Patch. For more information about supported systems for Easy2Patch, see [Windows Operating System Requirements](/planning/windows-operating-system-requirements).


# Windows Operating System Requirements

Scope: Easy2Patch (All versions)

This article details the Windows Operating System versions that you can use to host a Easy2Patch server role.

Starting Easy2Patch 1.0, Windows Server 2016, 2019, 2022 is supported for the Easy2Patch. Also With Easy2Patch 3.0, 64-bit Windows 10 and 64-bit Windows 11 systems started to be supported.&#x20;

Easy2Patch 4.0 can be install only Windows Server systems. Windows Server 2016, 2019, 2022 is supported for the Easy2Patch.

Easy2Patch 3.0 installation on Windows client systems is only recommended for Intune integration. If integration with WSUS, SCCM and Intune will be made, it is recommended to install it on the SCCM Software Update Point role.


# SQL Server Requirements

Easy2Patch 4.0

Easy2Patch 4.0 environment requires a supported SQL Server version and configuration to host the Easy2Patch database.

SQL Server can be located on:

* Configuration Manager Database server computer,
* A server that is remote or local that Easy2Patch will be install,

The following instances are supported:

* The default or named instance of SQL Server,
* A SQL Server Always On failover cluster instance,
* A SQL Server Always On Availability Group.

{% hint style="warning" %}
The database required for Easy2Patch can be hosted on SCCM's database server.

If this server will not be used, Easy2Patch can be used by establishing a separate instance. In this case, SQL Server 2022 Express edition is sufficient for Easy2Patch to run.
{% endhint %}

## Supported versions of SQL Server

In a hierarchy, Easy2Patch server access the SQL Server database:

* The SQL Server versions you use remain in support by Microsoft.
* For SQL Server 2016 and prior, support for each SQL Server version and service pack follows the [Microsoft Lifecycle Policy](https://learn.microsoft.com/en-us/lifecycle/products/?products=sql-server). Support for a specific SQL Server service pack includes cumulative updates unless they break backward compatibility to the base service pack version

SQL Server 2022: Standard, Enterprise or Express. You can use this version with latest cumulative update, as long as your cumulative update version is supported by the SQL Server lifecycle. RTM version is the minimum requirement for SQL Server 2022.

SQL Server 2019: Standard, Enterprise or Express. You can use this version with cumulative update 5 (CU5) or later, as long as your cumulative update version is supported by the SQL Server lifecycle. CU5 is the minimum requirement for SQL Server 2019 as it resolves an issue with scalar UDF inlining.

SQL Server 2017: Standard, Enterprise or Express. You can use this version with cumulative update version 2 or higher, as long as your cumulative update version is supported by the SQL Server lifecycle.

SQL Server 2016: Standard, Enterprise or Express. You can use this version with the minimum service pack and cumulative update supported by the SQL Server lifecycle.

SQL Server 2014: Standard, Enterprise or Express. You can use this version with the minimum service pack and cumulative update supported by the SQL Server lifecycle.

## SQL Server architecture version

Easy2Patch requires a 64-bit version of SQL Server to host the site database.

## Database collation <a href="#database-collation" id="database-collation"></a>

SQL Server that's used for the database must use the following collation: **SQL\_Latin1\_General\_CP1\_CI\_AS.**

## Database compatibility level

The following table identifies the recommended compatibility levels for Easy2Patch databases:

| SQL Server version | Supported compatibility levels | Recommended level |
| ------------------ | ------------------------------ | ----------------- |
| SQL Server 2014    | 120                            | 120               |
| SQL Server 2016    | 130, 120                       | 130               |
| SQL Server 2017    | 140, 130, 120                  | 140               |
| SQL Server 2019    | 150, 140, 130, 120             | 150               |
| SQL Server 2022    | 160, 150, 140, 130, 120        | 160               |


# Other Requirements

Scope: Easy2Patch 3.0, Easy2Patch 3.1, Easy2Patch 4.0

## RSAT

All versions of Easy2Patch require WSUS Binary files. For this purpose, RSAT (Remote Server Administration Tools for Windows 10) must be installed on Windows Client systems (Only Easy2Patch 3.x versions). The tool can be downloaded from the [Microsoft Download Center](https://www.microsoft.com/en-us/download/details.aspx?id=45520).

File Name: [WindowsTH-KB2693643-x64.msu](https://download.microsoft.com/download/1/D/8/1D8B5022-5477-4B9A-8104-6A71FF9D98AB/WindowsTH-KB2693643-x64.msu)

### Windows Server Update Services and/or Console

If it will be installed on the Software Update Point role, WSUS console binaries that must be installed on the system will be used. If there is no WSUS or console on the system, RSAT-WSUS must be installed via Server Manager.

## SCCM Console&#x20;

If you want to use features such as application deployment via SCCM with Easy2Patch, and the "Trigger SCCM" function during the update, the "AdminConsole.msi" console of SCCM must be installed.

## .Net Framework

It requires at least .Net Framework 4.7.2 or higher version for all versions of Easy2Patch including 4.0. Easy2Patch 4.0 requires .Net Core 8.x Hosting Bundle package also.


# Network Considerations

Scope: Easy2Patch (All Versions)

Easy2Patch integrates with Microsoft SCCM and Intune to deliver third-party software updates. For proper operation, specific network endpoints and firewall rules must be allowed. This document outlines the necessary access in compliance with the architecture diagram.

### Internet Access Requirements

#### Required Domains:

| Purpose            | URL                                                                                     | Notes                                                                                             |
| ------------------ | --------------------------------------------------------------------------------------- | ------------------------------------------------------------------------------------------------- |
| Licensing          | `https://license.arksoft.com.tr`                                                        | Used for license validation and activation.                                                       |
| Catalog access     | `https://*.easy2patch.com`                                                              | Access to update metadata, console communication.                                                 |
| Update source URLs | <https://blog.easy2patch.com/domain-list>                                               | Contains the list of vendor domains that Easy2Patch uses to fetch binaries (e.g., Adobe, Google). |
| Microsoft Intune   | <https://learn.microsoft.com/en-us/intune/intune-service/fundamentals/intune-endpoints> | Contains the list of URLs for Intune connection                                                   |

#### Ports:

* **TCP 443 (HTTPS)**
* **TCP 80 (HTTP)** – used by some vendor websites (not preferred)

**Note:** Although HTTPS is default, some vendors may only serve their binaries over HTTP (e.g., older web servers). Therefore, both ports must be allowed.

***

### 🖥️ SCCM Server Role Requirements

Easy2Patch must be installed on the SCCM server that hosts:

* **WSUS** (Windows Server Update Services)
* **SUP** (Software Update Point) role

#### Required Internal Communication:

| Source                             | Destination          | Protocol/Port       | Description                                              |
| ---------------------------------- | -------------------- | ------------------- | -------------------------------------------------------- |
| SCCM Site Server and SUP Role      | Internet             | TCP 80/443          | Downloads updates from vendors                           |
| Easy2Patch (WSUS/SUP)              | AD Domain Controller | TCP 389, TCP/UDP 88 | LDAP & Kerberos (for AD login/authentication)            |
| Clients (Only Management Clientsd) | SCCM Server          | TCP 443 (default)   | Management clients communicate with SUP/WSUS for updates |

> 📌 **Note:** The port used by client → SCCM SUP is configurable via IIS. Ensure the selected port for Easy2Patch (default 443) is allowed.

### 🔐 Licensing & Expiry

* Easy2Patch contacts `license.arksoft.com.tr` to assign a license.
* If the license server is unreachable:
  * The license remains active for **48 hours**.
  * After that, the license is **freed and unassigned**.
* Once the license is reacquired, it is **automatically re-assigned**.

> ✅ No manual re-activation is required after recovery.

### 📦 Intune Integration (Optional)

If you plan to use Easy2Patch with Microsoft Intune:

* Ensure outbound access to **all URLs and IP ranges listed by Microsoft**:
  * Refer to: Intune Endpoints
* These are required for:
  * App creation
  * Deployment through Microsoft Graph API
  * Tenant validation

### 🧱 Firewall Configuration Summary

| From                  | To                     | Protocol | Port    | Purpose                                    |
| --------------------- | ---------------------- | -------- | ------- | ------------------------------------------ |
| SCCM Site Server      | Internet               | TCP      | 443, 80 | Download update binaries from vendor sites |
| Easy2Patch (WSUS/SUP) | license.arksoft.com.tr | TCP      | 443     | License assignment                         |
| Easy2Patch (WSUS/SUP) | \*.easy2patch.com      | TCP      | 443     | Catalog, metadata, UI API                  |
| Easy2Patch            | AD Domain Controller   | TCP/UDP  | 389, 88 | LDAP/Kerberos Authentication               |
| Easy2Patch (WSUS/SUP) | Intune endpoints       | TCP      | 443     | App deployment via Microsoft Graph         |

### Reference Architecture

As visualized in the network diagram, Easy2Patch functions as a bridge between your SCCM/Intune infrastructure and the vendor update sources over the internet. All communication flows through secure, authenticated channels with fallback mechanisms to preserve license state for up to 48 hours.

<figure><img src="/files/DrRYKMxcLymboHITVDHY" alt=""><figcaption></figcaption></figure>


# Antivirus Exclusion List for Easy2PatchV3

Easy2Patch 3.1

To ensure optimal performance and to avoid conflicts with antivirus or endpoint protection solutions, we recommend adding the following Easy2Patch folders and files to your antivirus exclusion list.

These exclusions prevent antivirus software from interfering with critical operations such as software downloads, patch deployments, and PowerShell script executions.

## Recommended Folder Exclusions

The following directory should be excluded **recursively** (all subfolders and files):

```
C:\Program Files\Easy2Patch\Download
```

This folder is used to store update packages and temporary content required during patch processing.

## Recommended File Exclusions

Please add the following executable and script files to your antivirus exclusion list:

| Path                                                               | Description                                           |
| ------------------------------------------------------------------ | ----------------------------------------------------- |
| C:\Program Files\Easy2Patch\Easy2Patch.exe                         | Main user interface executable                        |
| C:\Program Files\Easy2Patch\Easy2PatchSvc.exe                      | Windows service responsible for background processing |
| C:\Program Files\Easy2Patch\Data\Applications\DtScriptTemplate.ps1 | PowerShell script template used for deployment        |
| C:\Program Files\Easy2Patch\Resources\E2PDTTool.exe                | Script runner for installing 3rd party updates        |
| C:\Program Files\Easy2Patch\Resources\E2PUI.exe                    | UI support component used by internal modules         |

### Notes

* These exclusions are **safe** and do not pose any security risk. All files are signed and maintained by **E2P**.
* If your antivirus solution provides options for **real-time protection**, **on-access scanning**, or **script monitoring**, make sure to apply the exclusions under all relevant categories.
* For enterprise antivirus solutions (e.g., Microsoft Defender ATP, McAfee, Symantec, CrowdStrike, etc.), please refer to their documentation for how to set up exclusions via policies or GPO.

### Example (Microsoft Defender)

If you're using **Microsoft Defender Antivirus**, you can apply exclusions using PowerShell:

```
Add-MpPreference -ExclusionPath "C:\Program Files\Easy2Patch\Download"
Add-MpPreference -ExclusionProcess "C:\Program Files\Easy2Patch\Easy2Patch.exe"
Add-MpPreference -ExclusionProcess "C:\Program Files\Easy2Patch\Easy2PatchSvc.exe"
Add-MpPreference -ExclusionProcess "C:\Program Files\Easy2Patch\Resources\E2PDTTool.exe"
Add-MpPreference -ExclusionProcess "C:\Program Files\Easy2Patch\Resources\E2PUI.exe"
Add-MpPreference -ExclusionExtension ".ps1"
```


# Antivirus Exclusion List for Easy2PatchV4

Easy2Patch 4.0

Easy2Patch downloads third-party vendor installers, builds deployment packages and delivers them to endpoints through Microsoft Configuration Manager, WSUS or Intune. Antivirus and endpoint protection products sometimes interfere with these operations.

This article documents the folders, processes and operations that Easy2Patch uses, so that your security team has the information needed to review them against your own policies. It is reference material for planning, not a configuration requirement.

> <mark style="color:red;">**Please note**</mark>
>
> <mark style="color:$danger;">**Antivirus exclusions reduce the coverage of your security controls. Whether to configure any of the items listed here, and at what scope, is a decision for your organization, to be taken in line with your internal security policy and the guidance of your antivirus vendor. Easy2Patch operates without exclusions in many environments; exclusions are normally considered only where a security product is observed to interfere with a specific operation. Responsibility for evaluating, applying and reviewing any exclusion rests with the organization that configures it.**</mark>

Unlike Easy2Patch v3, which ran on a single machine, v4 is a server product, so the relevant paths are spread across several systems.

***

### Systems involved

| System                  | Role                                                                              |
| ----------------------- | --------------------------------------------------------------------------------- |
| Easy2Patch web server   | Downloads vendor installers, extracts the catalog, signs scripts, builds packages |
| ConfigMgr content share | Stores the published application content                                          |
| WSUS server             | Stores locally published updates                                                  |
| SQL Server              | Hosts the Easy2Patch database                                                     |
| Managed endpoints       | Run the Easy2Patch detection scripts and installation components                  |

### 1. Easy2Patch web server

#### 1.1 Application folders

These folders are read and written continuously during normal operation. Where an exclusion is considered, it is normally applied recursively.

| Path                                              | Contents                                                                                                                                                                      |
| ------------------------------------------------- | ----------------------------------------------------------------------------------------------------------------------------------------------------------------------------- |
| `%ProgramFiles%\Easy2Patch Web Edition`           | Application root (default installation path)                                                                                                                                  |
| `%ProgramFiles%\Easy2Patch Web Edition\Logs`      | Application logs: `E2PApi.log`, `E2PApplication.log`, `E2PIntuneApplication.log`, `E2PUpdate.log`, `E2PEFLog.log`, `E2PDefender.log`, `E2PNone.log` and rotated `*.lo_` files |
| `%ProgramFiles%\Easy2Patch Web Edition\Resources` | `E2PDTTool.exe`, `E2PUI.exe`                                                                                                                                                  |
| `%ProgramFiles%\Easy2Patch Web Edition\FTW`       | Setup wizard and database scripts                                                                                                                                             |
| `%ProgramFiles%\Easy2Patch Web Edition\ConfigMgr` | ConfigMgr/WSUS agent sub-application                                                                                                                                          |
| `%ProgramFiles%\Easy2Patch Web Edition\wwwroot`   | Management console (web assets)                                                                                                                                               |

#### 1.2 Download and staging folders

The download root is configured in **Settings → General → Path**. By default it is the root of the first fixed drive on the server. Replace `<DownloadDrive>` below with the drive letter configured in your installation.

| Path                                             | Contents                                                |
| ------------------------------------------------ | ------------------------------------------------------- |
| `<DownloadDrive>\Download`                       | Downloaded catalog archive                              |
| `<DownloadDrive>\Download\Extract`               | Extracted catalog metadata                              |
| `<DownloadDrive>\Download\Deployment`            | Deployment working folder                               |
| `<DownloadDrive>\Download\Deployment\Publish`    | Published package content                               |
| `<DownloadDrive>\Download\Deployment\Publish\V2` | Update metadata (`*.sdp`)                               |
| `<DownloadDrive>\Download\Temporary`             | Downloaded vendor installers, one subfolder per package |

`<DownloadDrive>\Download` covers all of the above.

Every installer Easy2Patch publishes passes through `Download\Temporary`, where its digest is verified against the catalog. If a security product locks or quarantines a file during this stage, the digest check fails and the publish operation reports a download error rather than a virus detection. This is the most common reason for unexplained publish failures.

#### 1.3 Temporary folders

Easy2Patch also writes to the temporary folder of the IIS application pool identity.

| Path                          | Contents                                               |
| ----------------------------- | ------------------------------------------------------ |
| `%TEMP%\E2P-Extract`          | Catalog extraction                                     |
| `%TEMP%\dtScriptTemplate.ps1` | Detection script, created and signed during publishing |
| `%TEMP%\tempSignSicript.ps1`  | Signing working file                                   |
| `%TEMP%\E2P-SelfSignedCert`   | WSUS code-signing certificate generation               |
| `%TEMP%\<GUID>`               | Intune package (`.intunewin`) creation                 |

`%TEMP%` resolves according to the application pool identity:

| Application pool configuration                                                           | Temporary folder                                    |
| ---------------------------------------------------------------------------------------- | --------------------------------------------------- |
| Application pool identity without a loaded user profile, `LocalSystem`, `NetworkService` | `%SystemRoot%\Temp`                                 |
| Application pool with **Load User Profile** enabled                                      | `%SystemDrive%\Users\<identity>\AppData\Local\Temp` |
| Dedicated domain service account                                                         | `%SystemDrive%\Users\<account>\AppData\Local\Temp`  |

Determine which applies to your installation. Only the Easy2Patch subfolders listed above are involved; the temporary folder as a whole is not.

#### 1.4 IIS and .NET folders

These are standard IIS hosting locations, listed because the ConfigMgr agent sub-application compiles into them.

| Path                                                                        |
| --------------------------------------------------------------------------- |
| `%SystemDrive%\inetpub\temp`                                                |
| `%SystemDrive%\inetpub\logs`                                                |
| `%SystemRoot%\Microsoft.NET\Framework64\v4.0.30319\Temporary ASP.NET Files` |

#### 1.5 Processes

| Process                | Path                                                                     |
| ---------------------- | ------------------------------------------------------------------------ |
| IIS worker process     | `%SystemRoot%\System32\inetsrv\w3wp.exe`                                 |
| .NET host              | `%ProgramFiles%\dotnet\dotnet.exe`                                       |
| Easy2Patch host        | `%ProgramFiles%\Easy2Patch Web Edition\Easy2Patch.ClientUIWebPortal.exe` |
| Setup wizard           | `%ProgramFiles%\Easy2Patch Web Edition\FTW\FTW.exe`                      |
| Code-signing tool      | `%ProgramFiles%\Easy2Patch Web Edition\signtool.exe`                     |
| Script runner          | `%ProgramFiles%\Easy2Patch Web Edition\Resources\E2PDTTool.exe`          |
| Notification component | `%ProgramFiles%\Easy2Patch Web Edition\Resources\E2PUI.exe`              |

`w3wp.exe` hosts all IIS applications on the server, not only Easy2Patch. If your antivirus product supports scoping process rules to a specific application pool, restricting them to the **Easy2Patch** and **ConfigMgr** application pools keeps the scope narrower.

#### 1.6 Integrity verification

Before each publish operation, Easy2Patch verifies the SHA-256 hash of `signtool.exe`, `E2PDTTool.exe` and `E2PUI.exe`, and verifies `E2PDTTool.exe` and `E2PUI.exe` again after they are copied to the content share. If a security product quarantines or modifies any of these files, the publish operation stops with a hash mismatch error rather than continuing with an altered file.

***

### 2. ConfigMgr content share

Application content is written to the UNC path configured in **Settings → Application Deployment → Content Folder**, using the following structure:

```
\\<server>\<share>\<Category>\<Vendor>\<PackageId>\
    <vendor installer>
    E2PDTTool.exe
    E2PUI.exe
    appInfo.txt
```

This path is relevant on the file server that hosts the share.

Microsoft's standard Configuration Manager antivirus guidance applies to the site server and distribution points independently of Easy2Patch.

***

### 3. WSUS server

| Path                                                       |
| ---------------------------------------------------------- |
| `%ProgramFiles%\Update Services`                           |
| The `WsusContent` folder on the volume where it is located |

***

### 4. SQL Server

The instance hosting the Easy2Patch database is covered by Microsoft's standard SQL Server antivirus guidance (`*.mdf`, `*.ldf`, `*.ndf`, backup folders, `sqlservr.exe`). The Easy2Patch database stores catalog content and background job state and is written to continuously.

***

### 5. Managed endpoints

Two Easy2Patch components run on managed endpoints: `E2PDTTool.exe`, which performs installation and uninstallation, and `E2PUI.exe`, which displays end-user notifications. In addition, the deployment platform writes the Easy2Patch detection and requirement scripts to its system temporary folder and executes them from there.

#### 5.1 Folders

| Path                                                                 | Contents                                                                                         |
| -------------------------------------------------------------------- | ------------------------------------------------------------------------------------------------ |
| `%SystemRoot%\ccmcache`                                              | ConfigMgr content: vendor installer, `E2PDTTool.exe`, `E2PUI.exe`, `appInfo.txt`, `msi.log`      |
| `%SystemRoot%\CCM\SystemTemp`                                        | Detection and requirement scripts executed in system context                                     |
| `%SystemRoot%\CCM\ScriptStore`                                       | Cached deployment scripts                                                                        |
| `%ProgramData%\Microsoft\IntuneManagementExtension\Content\Incoming` | Intune package as delivered                                                                      |
| `%ProgramData%\Microsoft\IntuneManagementExtension\Content\Staging`  | Intune package after extraction                                                                  |
| `%ProgramData%\Microsoft\IntuneManagementExtension\Policies\Scripts` | Intune detection and requirement scripts                                                         |
| `%SystemRoot%\Temp\E2P`                                              | `E2PDTTool.exe` log files, one per package, when running in system context                       |
| `%TEMP%\E2P`                                                         | `E2PDTTool.exe` log files when running in user context                                           |
| `%ProgramData%\Easy2PatchLog`                                        | Detection script log `E2PLogs.log` and its rotated copy `E2PLogs.lo_`, written in system context |
| `%TEMP%\E2PLogs.log`                                                 | Detection script log when the script runs in user context                                        |

Only the `E2P` subfolder of `%SystemRoot%\Temp` is involved, not the folder as a whole.

#### 5.2 Processes

| Process                     | Path                                                          |
| --------------------------- | ------------------------------------------------------------- |
| Installation runner         | `E2PDTTool.exe`                                               |
| End-user notification       | `E2PUI.exe`                                                   |
| Windows PowerShell (64-bit) | `%SystemRoot%\System32\WindowsPowerShell\v1.0\powershell.exe` |
| Windows PowerShell (32-bit) | `%SystemRoot%\SysWOW64\WindowsPowerShell\v1.0\powershell.exe` |

Both PowerShell hosts are involved: the Easy2Patch detection script performs a separate 32-bit pass in order to read the `WOW6432Node` uninstall registry hive. Where your antivirus product allows it, rules can be scoped to scripts executed from the ConfigMgr or Intune script folders listed in section 5.1, which is narrower than addressing `powershell.exe` as a whole.

`E2PDTTool.exe` starts `msiexec.exe` and `cmd.exe` during installation and uninstallation, and runs under the Configuration Manager client (`CcmExec.exe`). These are shared Windows and Configuration Manager components used by all software deployment on the machine, so addressing the content folders in section 5.1 is more precise than addressing those processes.

#### 5.3 Behavioral detections

Folder and process rules do not affect behavior-based detection. The following operations are part of normal Easy2Patch installation behavior and may be reported by endpoint detection and response products. If they are, they are typically handled with a behavioral allow rule or a file-hash indicator rather than a folder exclusion.

| Operation                                                                                                                                                                         | Purpose                                                                                                                                                                                                                                                  |
| --------------------------------------------------------------------------------------------------------------------------------------------------------------------------------- | -------------------------------------------------------------------------------------------------------------------------------------------------------------------------------------------------------------------------------------------------------- |
| Writing a `Debugger` value under `HKLM\SOFTWARE\Microsoft\Windows NT\CurrentVersion\Image File Execution Options\<application>.exe`, in both the 32-bit and 64-bit registry views | Prevents the user from restarting the application while it is being updated. The value points to `E2PUI.exe`, which displays an update-in-progress message, and is removed once installation completes. Corresponds to MITRE ATT\&CK technique T1546.012 |
| Terminating running applications listed in the package's process conflict list                                                                                                    | Releases file locks so the installation can proceed. T1562.001                                                                                                                                                                                           |
| Running the application's registered uninstall command through `cmd.exe` from the content folder                                                                                  | Standard uninstall path for EXE-based applications. T1059.003                                                                                                                                                                                            |
| Enumerating all subkeys of `HKLM\SOFTWARE\Microsoft\Windows\CurrentVersion\Uninstall` in both registry views                                                                      | Detects the installed version of the target application. T1518                                                                                                                                                                                           |

Where registry rules are supported, scoping the Image File Execution Options entry to writes performed by `E2PDTTool.exe` is narrower than addressing the registry key itself.

#### 5.4 Microsoft Defender attack surface reduction rules

The following ASR rules can block third-party application deployment. Microsoft supports per-rule exclusions, which allow the ConfigMgr content share and the ConfigMgr cache to be addressed without turning the rule off.

* Block executable files from running unless they meet a prevalence, age, or trusted list criterion
* Use advanced protection against ransomware
* Block process creations originating from PSExec and WMI commands

***

### 6. File types

Within the folders listed in sections 1.2, 2 and 5.1, the following file types occur during normal operation:

`.exe` · `.msi` · `.msp` · `.msu` · `.zip` · `.cab` · `.sdp` · `.intunewin` · `.ps1` · `.txt` · `.json`

These are common file types found throughout Windows. Any rule based on them is far more precise when scoped to the folders above than when applied globally.

***

### 7. Network access

Where a web filtering, TLS inspection or egress proxy layer is in place, the Easy2Patch server requires access to:

<table><thead><tr><th width="415">Destination</th><th>Purpose</th></tr></thead><tbody><tr><td><code>https://license.arksoft.com.tr</code></td><td>Licensing and catalog download</td></tr><tr><td><code>https://graph.microsoft.com</code></td><td>Intune application management and Entra ID</td></tr><tr><td><code>https://login.microsoftonline.com</code></td><td>Authentication</td></tr><tr><td><code>https://api.securitycenter.microsoft.com</code></td><td>Microsoft Defender for Endpoint vulnerability data</td></tr><tr><td>Configured timestamp server (default <code>http://timestamp.digicert.com</code>)</td><td>Code signing</td></tr><tr><td>https://picblobstorage.blob.core.windows.net/*</td><td>Installer downloads</td></tr></tbody></table>

Vendor download URLs are supplied by the catalog and change with each catalog release, so a fixed list is not possible. Outbound HTTPS access from the Easy2Patch server, or a proxy configured under **Settings → Proxy** with the allow list maintained at the proxy, are the two usual approaches.

Internal ports used: SQL Server `1433`, WSUS `8530` / `8531`, LDAP `389` / `636`, SMTP `587`, and DCOM/WMI (`135` plus the dynamic RPC range) to the ConfigMgr SMS Provider.

### 8. Scope guidance

Where an exclusion is applied, keeping it as narrow as possible limits its effect on your overall protection. The following are broader than anything described in this article:

| Broad                                                   | Narrower alternative                                         |
| ------------------------------------------------------- | ------------------------------------------------------------ |
| The entire system drive or the `%ProgramFiles%` tree    | The specific folders in section 1.1                          |
| `%SystemRoot%\Temp` in full                             | `%SystemRoot%\Temp\E2P` and the subfolders in section 1.3    |
| `*.exe` or `*.ps1` as global file type rules            | The same file types scoped to the folders in section 6       |
| `msiexec.exe`, `cmd.exe`, `rundll32.exe`, `CcmExec.exe` | The content folders in section 5.1                           |
| `powershell.exe` across the endpoint estate             | Scripts executed from the ConfigMgr or Intune script folders |
| The Image File Execution Options registry key           | Writes performed by `E2PDTTool.exe`                          |

Reviewing any applied exclusion periodically, and removing it once it is no longer needed, is good practice.

***

### 9. Troubleshooting

| Symptom                                                                      | Likely cause                                                                              |
| ---------------------------------------------------------------------------- | ----------------------------------------------------------------------------------------- |
| Publish fails with a download error, but the URL is reachable                | The installer is being scanned or quarantined in `Download\Temporary`. See section 1.2    |
| Publish fails with a hash mismatch for `E2PDTTool.exe` or `E2PUI.exe`        | The file has been modified or quarantined on the content share. See section 2             |
| Publish fails during script signing                                          | The temporary folder in use does not match the application pool identity. See section 1.3 |
| Deployment reports success but the application is not installed              | An ASR rule is blocking the installer. See section 5.4                                    |
| The target application cannot be started after a failed deployment           | The Image File Execution Options entry was not removed. See section 5.3                   |
| Deployments fail on protected endpoints with no antivirus detection recorded | Check the endpoint detection and response behavior log against section 5.3                |

Endpoint deployment failures are recorded in `%SystemRoot%\CCM\Logs\AppEnforce.log` and `AppDiscovery.log`, and in the Easy2Patch logs under `%SystemRoot%\Temp\E2P` and `%ProgramData%\Easy2PatchLog`.

***

### 10. About the Easy2Patch components

`E2PDTTool.exe`, `E2PUI.exe` and `signtool.exe` are digitally signed, and their hashes are verified by the application before every publish operation. The vendor installers Easy2Patch distributes are downloaded over HTTPS and verified against the digest published in the Easy2Patch catalog.

If a security product reports a detection on an Easy2Patch component, please contact Easy2Patch support with the detection details so that the file can be verified and, where appropriate, submitted to the vendor for review.


# Design

Scope: Easy2Patch 3.0, 3.1, 4.0

Easy2Patch can update the 3rd party software in your structure with different scenarios. Although the features it contains vary depending on the license, it allows you to turn it on or off if you have the appropriate license.

With a single installation, you can use the feature you want and disable the feature you don't want.

Easy2Patch 3.x can be installed on Windows Server or Windows Client, which is already supported by Microsoft, depending on the scenario in which it will be used.

Easy2Patch 4.x can be installed only on Windows Servers, which is already supported by Microsoft, depending on the scenario in which it will be used.


# Update & Application & Intune (Server Deployment)

Scope: Easy2Patch (All Versions)

## Easy2Patch 3.x

In this deployment model, the server where SCCM's Software Update Point (SUP) role is installed is used. Before installing Easy2Patch on the server with the SUP role, at least WSUS Console and if it will be used SCCM Admin Console must be installed. It communicates with the SUP role. It performs this operation from TCP 8531 / TCP 443 or the specified any other Secure WSUS Port number.

In the configurations made here, the choice of Standalone WSUS does not affect the requirements and design.

{% hint style="warning" %}
If you want to install Easy2Patch 3.x software other than SUP/WSUS machine, WSUS role must be configured with Secure SSL Access.
{% endhint %}

## Easy2Patch 4.x

In this deployment model, the server where SCCM's Software Update Point (SUP) role is installed is used. Before installing Easy2Patch on the server with the SUP role, at least WSUS Console and if it will be used SCCM Admin Console must be installed. It communicates with the SUP role. It performs this operation from TCP 8531 / TCP 443 or the specified any other Secure WSUS Port number.

Easy2Patch Web version consists of 2 components. If you want to install Easy2Patch WE in a distributed structure, the 1st component, .Net Core, can be installed on another server independent of the SUP/WSUS server. The second part, the ConfigMgr application, must be installed on the SUP/WSUS server.

In the configurations made here, the choice of Standalone WSUS does not affect the requirements and design.

{% hint style="warning" %}
If you want to install Easy2Patch 4.x software ConfigMgr application other than SUP/WSUS machine, WSUS role must be configured with Secure SSL Access.
{% endhint %}


# Standalone WSUS Deployment

Scope: Easy2Patch (All Versions))

With independent WSUS distribution, 3rd party software is only sent over the WSUS channel. There is no integration with SCCM in this deployment model. SCCM trigger functions do not work. Updates are sent automatically by superseding previous versions.

It is a feature available in all license segments. Management of updates can be executed from the Easy2Patch screen and/or from the WSUS console. Operations such as deletion and republishing can be carried out from the maintenance and update management screens of Easy2Patch.


# Standalone Intune Deployment

Scope: Easy2Patch 3.x, Easy2Patch 4.x

The Intune capability that comes with the Easy2Patch Enterprise license can be configured as Standalone Intune Configuration if desired to be used in environments without WSUS and SCCM.

In this scenario, updates and/or applications are not deployed on WSUS and/or SCCM. All WSUS and SCCM settings in Easy2Patch are turned off. None of the WSUS and SCCM activities are executed.

It is a feature available in only Enterprise license. Management of updates can be executed from the Easy2Patch screen and/or from the [Intune management portal](https://endpoint.microsoft.com). Operations such as deletion and republishing can be carried out from the maintenance, update and application management screens of Easy2Patch.


# Deployment

Scope: Easy2Patch (All Versions)

After you plan out your Easy2Patch topology, use the information in the following articles:

* Installing WSUS Console
* Installing SCCM Admin Console
* Configuring Intune Application Registration
* Getting Code-Signing Certificate
* Installing Easy2Patch


# Installing WSUS Console

Scope: Easy2Patch (All Versions)

The WSUS console is a prerequisite for Easy2Patch installation. The console needs to be installed independently of any features. Installation methods differ according to the system where the console is installed.

{% hint style="warning" %}
Attention

Only Easy2Patch 3.x and previous versions can be install on Windows Clients. Easy2Patch 4.x versions can be install only Windows Server systems.
{% endhint %}

## Software Update Point (SUP) Role

It is recommended to install on the Software Update Point role so that Easy2Patch can run in environments with WSUS and SCCM without needing additional system resources. The recommended scenario is to install Easy2Patch on the server where this role is running. The WSUS console must be installed on this server role as required by the SUP role. However, if the console is not installed, the WSUS console can be installed with the command below.

{% code lineNumbers="true" %}

```powershell
Install-WindowsFeature -Name UpdateServices-RSAT -IncludeAllSubFeature
```

{% endcode %}

## Member Windows Server

Apart from the recommended configuration, Easy2Patch can be installed on a member server. In this case, the WSUS console must be installed on the server. The following powershell command is used for console installation.

{% code lineNumbers="true" %}

```powershell
Install-WindowsFeature -Name UpdateServices-RSAT -IncludeAllSubFeature
```

{% endcode %}

## Windows 10/11 Client Operating System

Especially in scenarios such as Intune, in the recommended installation model, Easy2Patch can run on client operating systems other than the server. In this case, [**Remote Server Administration Tool**](https://www.microsoft.com/download/details.aspx?id=45520) will be required to be installed on the client system. Doing the installation will be enough for Easy2Patch to work.

### Windows 10

Remote Server Administration Tool must be installed on Windows 10 systems. The file can be downloaded from the Microsoft Download Center.

RSAT on Windows Download Center: <https://www.microsoft.com/download/details.aspx?id=45520>

### Windows 11

On Windows 11 systems, the Remote Server Administration Tool is located under Windows Features. It can be installed from the Add or Remove Windows Features screen or with the command below.

{% code lineNumbers="true" %}

```powershell
Get-WindowsCapability -Name Rsat.WSUS.Tools~~~~0.0.1.0 -Online | Add-WindowsCapability -Online
```

{% endcode %}


# Wsus Manegement Tool

<https://dl.easy2patch.com/dl/arksoft/WSUSMgmt/WSUSMgmtTool.exe>

**WSUS Management Tool — Free WSUS and SCCM Software Update Admin App**

WSUS Management Tool is a free Windows utility that streamlines patch management for Windows Server Update Services (WSUS) and Microsoft Configuration Manager (MECM / SCCM). It delivers bulk decline/undecline/delete of updates, phased server cleanup, orphan category removal, WSUS signing certificate lifecycle management, third-party update analysis, offline HTML reporting with embedded Chart.js graphs, scheduled automation, auto-decline rules, Slack/Teams/Email/ServiceNow notifications, and full audit logging — all from a single console. Built on .NET Framework 4.7.2, portable, no installer required. Ideal for WSUS admins, SCCM engineers, and Windows patch management teams on Windows Server 2016/2019/2022/2025.

| **Feature**                                          | **Description**                                                                                                                           |
| ---------------------------------------------------- | ----------------------------------------------------------------------------------------------------------------------------------------- |
| **Bulk Decline / Undecline / Delete**                | Parallel bulk action (8 threads) on filtered updates; includes undecline — which the WSUS SDK does not expose natively                    |
| **Rich Text Filtering**                              | #digits, #nodigits, #len>=5, #num>=5000000, /regex/, wildcard, and NOT toggle                                                             |
| **Cache + Delta Refresh**                            | On connect the list loads instantly from disk cache; only updates arrived since last sync are pulled from WSUS                            |
| **Superseded Chain Viewer**                          | View an update's superseded ancestors and descendants in a single screen                                                                  |
| **Category Manager**                                 | Detect orphan / duplicate categories (like a rogue duplicate ARKSOFT); delete updates in a category + trigger cleanup                     |
| **WSUS Signing Certificate Management**              | Wipe a broken/private-key-less certificate from all 3 stores + SDK, install self-signed or a PFX, distribute to Root and TrustedPublisher |
| **Phased Server Cleanup**                            | Splits the WSUS Server Cleanup Wizard into 4 phases so it survives WCF timeouts; reports disk space freed                                 |
| **WSUS and SCCM Sync Trigger**                       | One-click WSUS sync and SCCM software update sync; 4 fallback paths across WMI and PowerShell                                             |
| **HTML Reports (Offline)**                           | Full WSUS report + SCCM-3rd-party report; Chart.js is embedded, so the report opens without internet                                      |
| **Interactive HTML Tables**                          | Sticky headers, per-table search box, click-to-sort columns (numeric + text aware)                                                        |
| **SCCM WMI + SQL Integration**                       | Queries v\_UpdateInfo, v\_AuthListInfo, v\_CIAssignment, v\_DeploymentSummary in the CM\_\<SITECODE> database                             |
| **Compliance Rollup**                                | Required / Installed / Not Applicable / Unknown metrics from v\_UpdateSummaryPerCollection at the All Systems collection                  |
| **3rd Party Update Analytics**                       | Vendor + Product breakdowns, deployed / superseded / expired distributions, dashboard charts                                              |
| **Auto-Decline Rules**                               | Rule engine on Superseded / Expired / NotApproved / age / product / classification criteria; run now or schedule                          |
| **Scheduled Tasks**                                  | In-app cron-like scheduler — cleanup, reports, sync, and rule engine run automatically at a chosen time                                   |
| **Slack / Teams / Email / ServiceNow Notifications** | Push cleanup / decline / sync results to any configured channel                                                                           |
| **Audit Log**                                        | Every bulk action (decline, delete, cert change, cleanup) is written to a timestamped, user-stamped log file                              |
| **CVE / MSRC Enrichment**                            | Enrich CVEs found in Bulletin/Title fields with CVSS scores via the NVD API                                                               |
| **Update Aging Report**                              | Age distribution of approved updates; flags such as "no deployment in 6+ months"                                                          |
| **Bandwidth Analysis**                               | WSUS content directory size + classification-based footprint estimate                                                                     |
| **Compliance Drift**                                 | KB-level delta comparison between two cache/report snapshots taken at different times                                                     |
| **Deployment Failure Root Cause**                    | SCCM deployments sorted by error count (SQL-backed)                                                                                       |
| **PDF Export**                                       | One-click HTML → PDF via Edge / Chrome / wkhtmltopdf headless                                                                             |
| **SCCM Client Force Scan**                           | Pick machines from the auto-loaded WSUS list; trigger Software Updates Scan + Deployment Evaluation Cycle via WMI                         |
| **Not-Contacted-Since Widget**                       | List of machines that haven't reported to WSUS in the last N days                                                                         |
| **Reboot Pending Report**                            | Machines stuck in "installed / pending reboot" state                                                                                      |
| **WSUS Content Folder Analysis**                     | Content directory size + top 20 largest subfolders                                                                                        |
| **Duplicate SUG Detector**                           | Detects Software Update Groups that share the exact same member set                                                                       |
| **SUSDB Reindex**                                    | Auto rebuild/reorganize on all SUSDB indexes with fragmentation > 5%, then sp\_updatestats                                                |
| **Cert Store Schema Compare**                        | Thumbprint-level compare of WSUS certificates across LocalMachine\WSUS, Root, and TrustedPublisher stores                                 |
| **WSUS Log Viewer**                                  | Filtered viewer for logs under %ProgramFiles%\Update Services\LogFiles\\                                                                  |
| **Filter Presets**                                   | Save complex filter combinations (e.g. "Critical + last 30 days + not-approved") under a name                                             |
| **Grid Column Manager**                              | Right-click to show/hide columns; layout persists to settings.json next to the exe                                                        |
| **Dashboard**                                        | On connect, KPI cards for Total / Approved / Declined / Superseded / Computer states                                                      |
| **Multi-Tenant Connection Switch**                   | Session switcher across multiple WSUS/SCCM environments; each environment gets its own cache/settings                                     |
| **Portable, No Installer**                           | Single exe (\~600 KB) + Newtonsoft.Json.dll; cache/settings/logs live next to the exe; runs on Windows Server and Windows 10/11           |


# Installing SCCM Admin Console

Scope: Easy2Patch (All Versions)

In scenarios where the standalone WSUS or Intune distribution model will not be used, it is recommended to install the SCCM Admin Console because it can be connected to the SCCM server. Although installation is not required, SCCM Admin Console should be installed if trigger functions on SCCM side and application distribution functions over SCCM are desired.

The location of the AdminConsole.msi file varies depending on the directory where SCCM is installed. In the installation directory of SCCM, the setup file can be found in the following location.

*{InstallationFolder}*\tools\ConsoleSetup\Admin.Console.msi

* The installation is started by pressing the Install button on the program.

![](/files/BRTgDLYtIyulz79LHJja)

* Enter your SCCM Site Server name, then click next.

![](/files/pmrl4s1c2IAYghkq0kzO)

* Check the installation directory and click Next.

![](/files/vovPDQdifaULGpXCromL)

* Click Install button to install console.

![](/files/zvzLiAyDJWOZFpC7OhLe)

* After the installation is finished, click Finish.

![](/files/QP4B6L94rtHKlr6sCJwL)


# Installing IIS Component for Easy2Patch 4.0

Scope: Easy2Patch 4.0

Easy2Patch Server role needs IIS service to run. The site should be secured with a valid HTTPS certificate.&#x20;

The necessary IIS components and the [PowerShell script](#powershell-komutu) required for the installation of these components are given below.&#x20;

## Powershell Command

You should open Powershell screen with RunAs Administrators right. Paste powershell command in this screen.

{% code title="InstallIIS.ps1" overflow="wrap" lineNumbers="true" %}

```powershell
Add-WindowsFeature Web-Server,Web-WebServer,Web-Common-Http,Web-Default-Doc,Web-Dir-Browsing,Web-Http-Errors,Web-Static-Content,Web-Http-Redirect,Web-Health,Web-Http-Logging,Web-Custom-Logging,Web-Log-Libraries,Web-Request-Monitor,Web-Performance,Web-Stat-Compression,Web-Security,Web-Filtering,Web-Windows-Auth,Web-App-Dev,Web-Net-Ext,Web-Net-Ext45,Web-ASP,Web-Asp-Net,Web-Asp-Net45,Web-ISAPI-Ext,Web-ISAPI-Filter,Web-WebSockets,Web-Mgmt-Tools,Web-Mgmt-Console,Web-Mgmt-Compat,Web-Metabase,Web-WMI,Web-Scripting-Tools,Web-Mgmt-Service
```

{% endcode %}


# Configuring Intune Application Registration

Scope: Easy2Patch (All Versions)

General steps to configure application registration for Intune application management.

1. Sign in to the Azure portal ([https://portal.azure.com](https://portal.azure.com/)).
2. Select "Azure Active Directory" from the left-hand navigation menu.
3. Select "App registrations" under the Manage section.
4. Click on "New registration" to create a new application registration.
5. Enter a name for your application, choose the supported account types, and enter a redirect URI (if applicable).
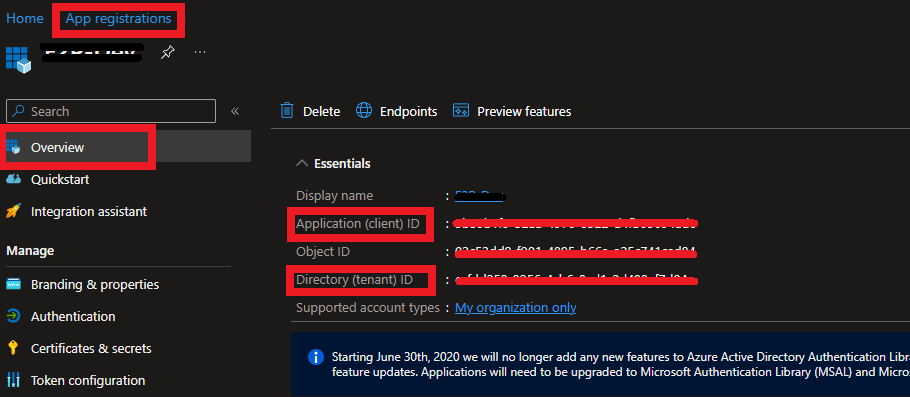
6. After registering the application, note the Application ID and Tenant ID. These will be used later in the Intune application configuration.
7. In Intune, navigate to "Client apps" and select "App registration" from the left-hand navigation menu.
8. Click on "Add" to create a new app registration.
9. Enter the Application ID and Tenant ID from step 6 and click "Next".
10. Select the app management capabilities you want to configure, such as app protection policies and app configuration policies.
11. Complete the configuration and assign the app registration to users or groups as needed.

{% hint style="info" %}
Note that these steps are general and may differ slightly depending on your specific Intune configuration and requirements. Always refer to official documentation and best practices for guidance when configuring Intune application management.
{% endhint %}

## Microsoft Graph Permissions

You should give some permissions for manage applications in intune for Application registration. In the **Select permissions** table view, search for “**DeviceManagement**”, **"Application"**, **"User"** and **"Device"** and under those permissions, enable the following:

* **Application.Read.All:** Read all applications
* **Application.ReadWrite.All**: Read and write all applications
* **Device.Read.All**: Read
* **DeviceManagementApps.ReadWrite.All:** View and create applications in Intune
* **DeviceManagementConfiguration.Read.All:** View properties and relationships of assignment filters
* **DeviceManagementManagedDevices.Read.All:** View device inventory for the auto-publish feature
* **DeviceManagementRBAC.Read.All:** View scopes to be assigned to applications
* **DeviceManagementServiceConfig.ReadWrite.All:** Update Enrollment Status Page configurations
* **User.Read:** Sign in and read user profile
* **User.Read.All:** Read all users' full profiles

Then, search for **“GroupMember”**, **"Group"** and under Group permissions, enable:

* **GroupMember.Read.All:** View Azure AD groups to enable automatic application deployment
* **Group.Read.All**: Read all groups

## Windows Defender ATP Permissions

You should give some permissions for manage Defender Integration in intune for Application registration. In the **Select permissions** table view, search for “**Alert**”, **"Ip"**, **"Machine", "Score**",  "**SecurityBaselinesAssessment**", "**SecurityConfiguration**", "**SecurityRecommendation**", "**Vulnerability**", "**User**", "**Software**", and **"RemediationTasks"** and under those permissions, enable the following:

* **Alert.Read.All**: Read all alerts
* **Ip.Read.All:** Read IP address profiles
* **Machine.Read.All:** Read all machine profiles
* **Machine.ReadWrite.All:** Read and write all machine information
* **Machine.Scan:** Scan machine
* **RemediationTasks.Read.All:** Read all remediation tasks
* **Score.Read.All:** Read Threat and Vulnerability Management score
* **SecurityBaselinesAssessment.Read.All:** Read all security baselines assessment information
* **SecurityConfiguration.Read.All:** Read all security configurations
* **SecurityRecommendation.Read.All:** Read Threat and Vulnerability Management security recommendations
* **Software.Read.All:** Read Threat and Vulnerability Management software information
* **User.Read.All:** Read user profiles
* **Vulnerability.Read.All:** Read Threat and Vulnerability Management vulnerability information


# AppRegistration Wizard for Intune

## Overview

**IntuneAppRegCreator.exe** is a command-line tool built on **.NET Framework 4.7.2** that allows IT administrators to securely and interactively register an Azure AD Application with the required Microsoft Graph and Microsoft Defender for Endpoint (ATP) permissions.

This tool is specifically designed to support **Easy2Patch's Intune integration** by automating the App Registration process and assigning the correct permissions needed for seamless app deployment and management.

You can **download the tool here**:&#x20;

<https://dl.easy2patch.com/dl/arksoft/easy2patch/tools/IntuneAppRegCreator.sfx.exe>

## Key Features

* Authenticates using **interactive login with a Global Administrator** account.
* Creates an **Azure AD Application Registration** with a user-specified name and redirect URI.
* Automatically generates a **client secret** with a configurable validity period.
* Assigns all necessary **Microsoft Graph API** and **Defender ATP** permissions.
* Outputs a complete **registration summary** to console and saves it to a `.txt` file.
* Generates and optionally opens the **Admin Consent URL** in your default browser.

## System Requirements

| Component        | Version                           |
| ---------------- | --------------------------------- |
| .NET Framework   | 4.7.2                             |
| Operating System | Windows 10 or later (Admin user)  |
| Azure Role       | Azure AD **Global Administrator** |
| Browser          | Modern browser installed          |

## How to Use

**Download and extract the tool:**

Download the latest version of the tool from:\
<https://dl.easy2patch.com/dl/arksoft/easy2patch/tools/IntuneAppRegCreator.zip>

Then extract the contents of the `.zip` file to a folder of your choice, such as:

```
C:\Tools\IntuneAppRegCreator\
```

**Run the tool:**

Open **Command Prompt** as Administrator and navigate to the extracted folder:

```bash
cd C:\Tools\IntuneAppRegCreator
IntuneAppRegCreator.exe
```

**Follow the prompts:**

The tool will guide you through:

* Authenticating with Azure AD using your Global Admin account
* Entering the application name, redirect URI, and secret validity
* Creating the app registration, secret, and assigning permissions
* Displaying and saving the registration summary
* Optionally opening the Admin Consent URL in your browser

### Input Prompts

1. **Application Name**

   ```
   Enter application name (default: Easy2PatchProd):
   ```

   * If left blank, the default name **Easy2PatchProd** is used.
   * Must be unique within your Azure tenant.
2. **Redirect URI**

   ```
   Enter redirect URI (e.g., https://e2p.domain.com/#/auth/azuread/):
   ```

   * This is **mandatory**.
   * Must include the path: `/#/auth/azuread/`
   * Example: `https://e2p.contoso.com/#/auth/azuread/`
3. **Client Secret Validity (in days)**

   ```
   Enter client secret validity in days (default: 730):
   ```

   * If blank or invalid, default is **730 days** (2 years).

### Output Summary

After successful registration, the tool displays and saves:

* Application Name
* Application ID
* Object ID
* Client Secret Value
* Secret Expiry Date
* Tenant ID
* Admin Consent URL

This summary is saved to:

```
<ApplicationName>.txt
```

### Admin Consent

After the application is created and permissions are assigned, the tool will generate this URL:

```
https://login.microsoftonline.com/<tenant_id>/adminconsent?client_id=<app_id>
```

You will be asked:

```
Would you like to open the admin consent URL in your browser? (y/n):
```

> ⚠️ If the **admin consent page shows an error**, simply click your **browser’s Back button**, then scroll to the bottom of the page and **click "Accept"** again.

Admin consent **must** be granted by a Global Administrator to finalize the permission assignments.

### Important Notes

* This tool uses Microsoft's **public client ID** (Azure CLI) to perform login and requires no pre-registered application.
* The access token is used to call Microsoft Graph with full admin-level privileges, but **does not persist any login or store secrets**.
* Client secret will only be displayed once. **Copy and store it securely.**
* You can re-run this tool anytime to create additional app registrations.

### Troubleshooting

| Issue                            | Resolution                                                        |
| -------------------------------- | ----------------------------------------------------------------- |
| **User canceled authentication** | Do not close the browser login window. Restart the app if needed. |
| **Consent page shows an error**  | Click the **Back** button in browser and scroll down to accept.   |
| **Secret not saving**            | Ensure the tool has write access in the current directory.        |
| **App not visible in Azure**     | Check the Azure AD > App registrations under "All Applications".  |

### Use Case: Easy2Patch Intune Integration

This tool is specifically developed for Easy2Patch to:

* Automatically create the required App Registration in Azure AD
* Assign all permissions needed to manage apps and policies via Microsoft Intune and Defender for Endpoint
* Streamline setup for organizations deploying and patching software with Intune

### Requirements Summary

* You must be a **Global Administrator**
* You must have a **browser installed**
* Tool must be run **interactively**
* No service principal or client ID required

### Support

For Easy2Patch-related questions, contact:

* <support@easy2patch.com>,
* [Configuring Intune Application Registration](/deployment/configuring-intune-application-registration)


# Getting HTTPS Certificate

## Create Certificate Template for HTTPS Binding

To complete this step, Active Directory Certificate Services must be installed and configured. You can watch our "[Install and Configure Active Directory Certificate Services](https://youtu.be/1QjojDED2Aw)" video.

{% embed url="<https://www.youtube.com/watch?v=gNODANWE7Ak>" %}

1. Connect to the Certification Server of your Company. If you don't have any CA on your domain You should get suitable https certificate from Enterprise CA or you should create self sign certificate that not recommended.
2. Open the Certification Authority screen and go to the Certificate Templates area.
3. In the Certificate Authority window right click Certificate Templates node, select "Manage".
4. Find the Web Server template from the list, right-click on it and select Duplicate Template.

<figure><img src="/files/NDJ7QY3Csx6pbyUWSnkZ" alt=""><figcaption></figcaption></figure>

5. Make the following settings:

* General Tab: Fill the Display Name and Template Name fields,
* Request Handling: Select Allow private key to be exported option,
* In the Security tab, you must add users and/or computers that can request certificates, and the groups they belong to. In this example Domain Computers added to the list. You should add computer account of the SessionLimit server. Give computer account enroll right and then click OK.

{% hint style="danger" %}
This authority can be removed after completing the certification process.
{% endhint %}

<figure><img src="/files/EJEoyx1vkWLAXqD42OwV" alt=""><figcaption></figcaption></figure>

<figure><img src="/files/EmsemxQdo6hMN76y1rla" alt=""><figcaption><p>Private Key Behaviour</p></figcaption></figure>

<figure><img src="/files/UUrJtfyTsEYHTzgcOUrs" alt=""><figcaption><p>Security Window</p></figcaption></figure>

6. Click OK to save template and then Close Certificate Templates screen.
7. In the Certificate Authority window right click Certificate Templates node, point New then select "Certificate Template to Issue".
8. Select previously created template then click OK.

## Request HTTPS Certificate

{% embed url="<https://www.youtube.com/watch?v=bNxi8j31Fes>" %}

SessionLimit is a web-based application. Agents installed on computers work by connecting to SessionLimit web portal over HTTPS protocol.

1. To generate the certificate, certlm.msc is run on the SessionLimit server.

<figure><img src="/files/6DdTOGVIgba0O4nsdqc2" alt=""><figcaption><p>Local Machine Certificate Store</p></figcaption></figure>

2. Right click on Personnel, point to All Tasks, click Request New Certificate.

<figure><img src="/files/m1kVCiQAGIL1NgsdUctS" alt=""><figcaption><p>Request New Certificate</p></figcaption></figure>

3. Click next on the Before You Begin screen
4. Click Next on the Select Certificate Enrollment Policy screen,
5. Select the HTTPS Certificate template created in the previous step. This certificate requests some information. This information is the URL address to access the SessionLimit server. Click on the More Information link.

<figure><img src="/files/3HP8B8ooCS92oBe49EkX" alt=""><figcaption><p>Certificate Enrollment</p></figcaption></figure>

6. Subject Name and Alternative Name fields are filled in on the Subject screen.

   * Common Name: Server URL address is entered and transferred to the right with the Add button.
   * DNS: The server URL address is entered and transferred to the right with the Add button.

   Create the certificate, Click OK.

<figure><img src="/files/NSUwnLjCkyftGDbEw8mm" alt=""><figcaption></figcaption></figure>

7. The Enroll button becomes active on the Request Certificates screen. By clicking this button, the certificate enrollment process is completed. Clicking Finish will end the wizard.


# Getting Code-Signing Certificate

Scope: Easy2Patch (All Versions)

{% embed url="<https://www.youtube.com/watch?v=wIur89H_yTE>" %}

## Create Code-Signing Certificate Template&#x20;

To create a Code Signing certificate template in Windows Server Certification Authority, follow these steps:

1. Open the Certification Authority snap-in on your Windows Server.
2. Right-click the Certificate Templates folder, and select Manage.
3. In the Certificate Templates console, right-click Code Signing, and select Duplicate Template.
4. In the Duplicate Template dialog box, select Windows Server 2003 Enterprise as the template type.
5. In the General tab of the Properties dialog box, enter a unique name for the new template, such as "Code Signing 2019".
6. In the Request Handling tab, select "Allow private key to be exported".
7. In the Subject Name tab, select "Supply in the request".
8. In the Extensions tab, select "Application Policies" and click Edit.
9. In the Application Policies Properties dialog box, select "Code Signing" and click OK.
10. In the Security tab, add the appropriate users or groups who will be able to enroll for this certificate template.
11. Click OK to save the template.
12. Right-click the Certificate Templates folder, select New, and select Certificate Template to Issue.
13. In the Enable Certificate Templates dialog box, select the new Code Signing certificate template that you just created.
14. Click OK to close the dialog box.

After completing these steps, the Code Signing certificate template will be available for users or groups to enroll and obtain a code signing certificate from your Certification Authority.

## Request Code-Signing Certificate

To request a code signing certificate from a Windows Server Certification Authority (CA), you can follow the steps below:

1. Open the Certificates snap-in for the Microsoft Management Console (MMC). You can do this by pressing the Windows key + R on your keyboard, typing "certlm.msc" in the Run dialog box, and pressing Enter.
2. Click Personel then select Certificates in Local Machine certificate repository.
3. Right click Certificates folder,
4. Select All Tasks > Request New Certificate
5. In the Certificate Enrollment wizard, select "Active Directory enrollment policy".
6. Select "Code Signing" as the certificate template (as previously created template) and click Next.
7. Click More Information link,
8. In the Certificate Information window, provide the required information for the certificate, such as the Common Name and Organization.
9. Click the Details button to specify any additional information that you want to include in the certificate request, such as the Key Usage and Extended Key Usage.
10. Click Next to continue.
11. Submit the certificate request file to the Windows Server Certification Authority.

{% hint style="info" %}
Note: The steps may vary slightly depending on the version of Windows Server you are using.
{% endhint %}

## Installing Code Signing Certificate

General steps to import a code signing certificate to a local machine repository:

1. Open the Microsoft Management Console (MMC) by typing "mmc" in the Windows search bar and pressing Enter.
2. Click on "File" in the top left corner and select "Add/Remove Snap-in".
3. Select "Certificates" and click on "Add".
4. Choose "Computer account" and click on "Next".
5. Select "Local computer" and click on "Finish".
6. Click on "OK" to close the Add/Remove Snap-in window.
7. Expand the "Certificates (Local Computer)" folder and right-click on "Personal".
8. Select "All Tasks" and then "Import".
9. Follow the import wizard to browse and select the code signing certificate file and complete the import process.
10. After the import is completed, the code signing certificate should be available in the local machine repository under the "Personal" folder.

{% hint style="info" %}
Note: The exact steps may vary depending on the operating system and version of the MMC being used. It is also important to ensure that the code signing certificate is valid and issued by a trusted Certificate Authority (CA).
{% endhint %}

{% hint style="info" %}
The Code-Signing certificate to be used must be located under LocalComputer\My (Personnel). Therefore, it should not be continued without importing into this repository.
{% endhint %}


# Installing Easy2Patch 3.1

Scope: Easy2Patch 3.1

Easy2Patch is an application with unlimited usage rights that contains free catalogs. By registering, the demo version with all the features and the catalog is available for a limited time.

1. **Download**: Go to the [Easy2Patch ](https://www.easy2patch.com)website to download Easy2Patch. Click on the [Get 30 Day Premium Trial](https://www.easy2patch.com/premium-trial) link, and your browser should start downloading the program. Save the file to your preferred location on your computer.

<figure><img src="/files/Oc6T0AiLzFPO6sAusX3S" alt=""><figcaption><p><a href="https://www.easy2patch.com/premium-trial">Get 30 Day Premium Trial</a></p></figcaption></figure>

2. **Run the installer**: Once the download is complete, navigate to the location where you saved the file and double-click on it to run the installer. If a security warning appears, click on "Run" to continue.
3. **Installation**: The installer will guide you through the installation process, and you should carefully read and follow the instructions. You can install it in the default folder or a drive with large free disk space.

<figure><img src="/files/ZVgnBpBPBRq3nsehLbWU" alt=""><figcaption></figcaption></figure>

<figure><img src="/files/ncCsKRrDHESPJ9zUwyUb" alt=""><figcaption></figcaption></figure>

<figure><img src="/files/G8gi1UfSlUp8UvWoKwzS" alt=""><figcaption></figcaption></figure>

<figure><img src="/files/CMngGozyWt4wWgw5Snnq" alt=""><figcaption></figcaption></figure>

4. **Launch**: If the program does not launch automatically, you can find it in the Windows Start menu or on your desktop.

<figure><img src="/files/SXpeo5pCMXhFDeEFrK9O" alt=""><figcaption></figcaption></figure>


# Upgrading to Easy2Patch 3.1.10

Scope: Easy2Patch 3.x

It is important for stability and security that you use the latest version of your Easy2Patch 3.1.10 software. You can download the Easy2Patch product from the [download ](https://dl.easy2patch.com/dl/arksoft/easy2patch/Easy2Patch.msi)link and install it easily.

{% hint style="danger" %}
If there is an open Easy2Patch screen, you should close it.
{% endhint %}

{% hint style="info" %}
To run the Easy2Patch.msi setup file, you must open cmd.exe as Run As Administrator in the directory where the application is located and run the application from the command line.
{% endhint %}

## File Information

<table><thead><tr><th width="184">File Name</th><th width="143">Version</th><th>Hash (SHA256)</th></tr></thead><tbody><tr><td>ArkLicense.Model.dll</td><td>2.0.11.0</td><td>FC5185835B2612CFF8E2BBCE12E7E1FEDE9BB79A1C449C7274DDBB8E9F6634CA</td></tr><tr><td>Common.Common.dll</td><td>3.1.4.0</td><td>A904ECA5EAE1F1B92C1C961A8F512075050DDCCE2B817DA474549F11EEE40694</td></tr><tr><td>Common.Data.dll</td><td>2.0.11.0</td><td>2BCC0542EF9D55E45B7D3145C02A83B6CA2B537BC5F4A82632303AFAF8DE5B76</td></tr><tr><td>Easy2Patch.Client.SelfUpdate.exe</td><td>3.1.10.0</td><td>CE11E85ACBB37FDD7A49434658E51B956AA34AC4E7F2FC8FF8AD5603BA08E5CC</td></tr><tr><td>Easy2Patch.Common.dll</td><td>3.1.10.0</td><td>C424FF7838391792062F452F5F0439623771ED71B9DDB70B359AA179C1E7B870</td></tr><tr><td>Easy2Patch.exe</td><td>3.1.10.0</td><td>4A40EBC5B0F60114C5AF9A652D2C6A58F52A39B48C89BBC010C0E5E33CA985E5</td></tr><tr><td>Easy2PatchSvc.exe</td><td>3.1.10.0</td><td>53961F11B04DCD2F91242559B2D1C24B58C77F4F1349D354F301EA4BD45EC30A</td></tr><tr><td>E2PDTTool.exe</td><td>3.1.10.0</td><td>7CB2288D96182039958E68666E79560034A7EEAEAA6725351DE0B1DCE5351596</td></tr><tr><td>E2PUI.exe</td><td>3.1.10.0</td><td>E3971C400DEFBE410C6D1D8FAFE7CDDAF7D22B69871514D96CA023E2CA6CFC9E</td></tr></tbody></table>

## How to Upgrade

<figure><img src="/files/dVJeztuUuXu3zgyjQTTS" alt=""><figcaption><p>Run as Administrator Command Line of Powershell</p></figcaption></figure>

<figure><img src="/files/cerWjGfZxg8UixsohIBH" alt=""><figcaption><p>Click Next</p></figcaption></figure>

<figure><img src="/files/fYv3zko1IzAkbtQwC7I1" alt=""><figcaption><p>Click Next</p></figcaption></figure>

<figure><img src="/files/06ho5yGR8GbEJ8KGN27X" alt=""><figcaption><p>Click Install</p></figcaption></figure>

<figure><img src="/files/OU2M7Dhuos9kKVCpezZY" alt=""><figcaption><p>Select Automatically close and then click Next</p></figcaption></figure>

<figure><img src="/files/fwSJU35NI4O3oUmVpVyl" alt=""><figcaption><p>After installation completed, Click Finish</p></figcaption></figure>

<figure><img src="/files/Uxtg1Vr41k96ytCRwxez" alt=""><figcaption><p>Version and License Information</p></figcaption></figure>


# Licensing Easy2Patch 3.1

Scope: Easy2Patch 3.1

Registration and license key procedures to use Easy2Patch 3.1 software are explained below.

1. Run Easy2Patch with local administrator rights.
2. Make sure the application has Internet access and can go to [**https://license.arksoft.com.tr**](https://license.arksoft.com.tr).
3. Click the **Register & License** button in the About section.
4. You will see the **MachineID** value generated specifically for you on the screen. Additionally, you will see notification that you do not have a license package yet.

<figure><img src="/files/YuOcUNM0Wif36x14gZPP" alt=""><figcaption><p>Register to use Easy2Patch</p></figcaption></figure>

5. Click the **Register Owner** button. Fill in the information on the screen and press the Submit button.

<figure><img src="/files/AdYVT2j2Xy2eS4DyiLSH" alt=""><figcaption><p>License Owner Informations</p></figcaption></figure>

6. A verification code consisting of 6-digit numerical values will be sent to the E-Mail address you entered. Enter this code on the screen that will appear by pressing the **Email Key** button.

<figure><img src="/files/VODgMXXR03W7gNDQfPEh" alt=""><figcaption><p>Enter Confirm Key</p></figcaption></figure>

7. After this process, the **Demo Request** button will be activated. When you press this button, an inactive demo license will be created for you. The product key for this license will be contacted by the Easy2Patch team and sent to you via e-mail.

<figure><img src="/files/saj5vodY3osH0g5YbDPT" alt=""><figcaption><p>Demo Request</p></figcaption></figure>

8. Enter the product key sent to you by the Easy2Patch sales team on the screen that appears by pressing the **License Key** button. The product is ready for use so that all its features can be used for 30 days.

<figure><img src="/files/RdPydb9mNqh8JWMvN9Sn" alt=""><figcaption><p>License Key</p></figcaption></figure>


# Installing Easy2Patch 4.0

Scope: Easy2Patch 4.0

{% embed url="<https://youtu.be/fklAG0Pm_Y4>" %}

Easy2Patch is an application with unlimited usage rights that contains free catalogs. By registering, the demo version with all the features and the catalog is available for a limited time.

Before you Install Easy2Patch 4.0 on your server, you must complete prerequisites.&#x20;

1. [Install IIS Components](/deployment/installing-iis-component-for-easy2patch-4.0),
2. [Install Configuration Manager Console](/deployment/installing-sccm-admin-console),
3. [Install WSUS Console](/deployment/installing-wsus-console)
4. Install SQL Server if you don't want to use Configuration Manager's database server

## Installation Steps

1. **Download**: Go to the [Easy2Patch ](https://www.easy2patch.com)website to download Easy2Patch. Click on the [Get 30 Day Premium Trial](https://www.easy2patch.com/premium-trial) link, and your browser should start downloading the program. Save the file to your preferred location on your computer.

<figure><img src="/files/6vmO8joyGQGw0ll6FHi3" alt=""><figcaption></figcaption></figure>

2. **Run the installer**: Once the download is complete, navigate to the location where you saved the file and double-click on it to run the installer. If a security warning appears, click on "Run" to continue.
3. **Installation**: The installer will guide you through the installation process, and you should carefully read and follow the instructions. You can install it in the default folder or a drive with large free disk space.

<figure><img src="/files/UpWcjGk10VlcudGUe8Es" alt=""><figcaption></figcaption></figure>

<figure><img src="/files/HUH3ZlTJr1LZ2cnRqrKX" alt=""><figcaption></figcaption></figure>

<figure><img src="/files/o6lXHIwdkATyDOMbbpTN" alt=""><figcaption></figcaption></figure>

## Post Setup Steps

After the installation is completed, FTW (First Time Wizard) runs automatically. If it does not work, you can manually run the **FTW\.exe** application as "**Run As Administrator**" from the path **"SystemDrive:\Program Files\Easy2Patch Web Edition\FTW"**.

### Welcome

You have two option in this screen:

1. **Encrypt connection strings and other confidential information?**: If you select this option, the critical information (like password, username etc.) stored in appsettings and database, will be encrypted after setup completes.&#x20;

   a. If you use SQL Server Authentication Mode, sql account information will be encrypted

   b. If you use Secure access to LDAP, LDAP user account's password must be encrypted with this option.
2. **Remember wizard settings**: When this option selected, when you restart the wizard all settings (except passwords) will be remembered and filled. FTW settings are kept in the ftwsettings.json file located in the directory where FTW is located.&#x20;

### Installation Type

If you Install Easy2Patch 4.0 first time, you should select **New Installation of Easy2Patch**. If you will upgrade, you should select **Upgrade Easy2Patch to a new version**.

### IIS Settings

Easy2Patch 4.0 is an application that runs on IIS. During the setup, a web page named Easy2Patch and 2 Application Pools named Easy2Patch and ConfigMgr were created in IIS. FTW will configure this site and application pools.

**Host Name:** Enter the web address where the application will run. It is generally recommended to enter it in the FQDN format. Ex: e2p.domain.com.

**HTTP Port Number:** The port number that will listen to HTTP traffic. In the recommended configuration, although HTTPS works with the Enable SSL Binding option, only HTTP listening is possible to support offloading scenarios.

**Enable SSL Binding:** This option also enables HTTPS (TCP443) listening. If this option is selected, an appropriate SSL certificate must be selected from the combobox that will open.

**Application Pool:** Determines which account the Application Pool will work with. If SQL Authentication Mode is not used, the account selected in this field will be used in connections to the database.

**Local System:** The LocalSystem account, also referred to as "NT AUTHORITY\SYSTEM", is used.

**Custom Account:** Enter the user account as domain\username and the password for this account. If you want to use a GMSA account, LocalSystem is selected in the wizard and then the GMSA account is entered from IIS.

### Database

Unlike previous versions, Easy2Patch 4.0 stores all configurations and collected data in the database. On this screen, it is determined on which server and in which path the database named Easy2Patch will be created. Additionally, the ConnectionString definition is written to the AppSettings.json file according to the information provided on this screen.

**Server Name**:&#x20;

The name of the SQL Server server and instance information are entered. example: **SERVERNAME\INSTANCE** or just **SERVERNAME** if the default instance name is used

**Port**:&#x20;

The port number that the given instance listens to is entered in the Server name field. The default value is 1433.

**Database Name**:&#x20;

Database name is entered. The default is Easy2Patch. It can be changed.

**Database Physical Path (Data)**:

It is the physical path where the database's data file will be kept. The default value is read from SQL Server. If desired, it can be changed by entering appropriate path information on the server. The path information on the local or remote server can be browsed with the (...) button.

**Database Physical Path (Log)**:

It is the physical path where the database's log file will be kept. The default value is read from SQL Server. If desired, it can be changed by entering appropriate path information on the server. The path information on the local or remote server can be browsed with the (...) button.

**Enable SQL Authentication**:&#x20;

If this option is not selected, database connection is established with the account entered in the Application Pool. Authentication is done using the Windows Authentication method. If SQL Authentication mode is used and a SQL account will be used to access the database, this option must be selected and the SQL account must be entered. When this option is selected, a windows or active directory account cannot be used.

### **Active Directory**

If local Active Directory is used, Active Directory information is entered to authorize the accounts to be used to log in to the portal. If Active Directory is not used or Microsoft EntraID will be used to log in to the system, this field is left blank and Next is clicked.

**Domain FQDN**:&#x20;

Local Active Directory FQDN information should be entered. For example: domain.com

**Secure/Not Secure**:&#x20;

If you use Non-Secure LDAP Access you can select Not Secure. when you select Not secure port number of LDAP Access is 389. Other option should be selected when you want to access to Active Directory with secure tcp connection. When you select Secure option, Port number will be 636.

**Port**:&#x20;

The port number to which the LDAP connection will be made is entered. By default, non-secure connections use TCP 389, and secure connections use TCP 636.

**Authentication**:&#x20;

Regardless of the secure mode of access, user account information to be connected to Active Directory is entered. If this option is not selected, connection is made with the accounts entered in the Application Pool. Allows you to use GMSA. If this option is selected, the username and password must be entered in domain\username format. Password information will be stored encrypted in the database.

### Administrators

There is a default root user in the Easy2Patch portal. This user is a restricted administrator. Can perform basic functions and perform the minimum administrative activities required for the system to operate. This user's password will be determined on this screen. The password criteria must be at least 8 characters and meet at least 3 of the sets of lowercase letters, uppercase letters, numbers and special characters. It is mandatory to enter.

If Active Directory is used, the user account or Active Directory group is searched in the AD Search field and authorization can be provided by pressing the Add button. Authorizations can be changed after logging into the Easy2Patch portal. If Active Directory is not used, this field can be left blank.

### Prerequisites

This screen lists the prerequisites required for the application to run. In the Result tab, it will be seen whether the prerequisite is met or not.

### Review

Once all settings have been made, a final summary will be provided. After this stage, Easy2Patch post setup operations are performed with the information provided.


# Upgrading Easy2Patch 4.0

Scope: Easy2Patch 4.0

It is important for stability and security that you use the latest version of your Easy2Patch 4.x software. You can download the Easy2Patch product from the [download ](https://dl.easy2patch.com/dl/arksoft/easy2patch/Easy2PatchWE40.msi)link and install it easily.

{% hint style="danger" %}
Easy2Patch 4.0 cannot be upgraded over Easy2Patch 3.x. It is a new installation. However, Easy2Patch 3.x users can continue to use them with the same settings by importing their existing settings files onto Easy2Patch 4.0. See [Migration](/configuring/easy2patch-4.0-settings/migrate-from-easy2patch-3.x).
{% endhint %}

1. Run the command line as Administrator. Go to the directory where the setup file is located and run the setup as follows.

<figure><img src="/files/498SfKy2JCo7EFZ7Ps72" alt=""><figcaption><p>Run setup file in Command Line as Administrator</p></figcaption></figure>

2. Click Install button to install or upgrade Easy2Patch.

<figure><img src="/files/kccxMDnV8KKVmsEgXqSL" alt=""><figcaption><p>Install 4.0 Package</p></figcaption></figure>

3. After the installation is complete, FTW will run automatically. FTW will ask if you want to use the remaining settings from the previous installation. Yes can be clicked on this screen. If No is clicked, all settings must be entered from the beginning.

<figure><img src="/files/askzvaadtB11tTwpDcig" alt=""><figcaption><p>FTW Warns You to Use Existing Configuration File. Click Yes.</p></figcaption></figure>

4. After FTW is opened, click Next on the Welcome screen.

<figure><img src="/files/JTgrHfA6dGyncaJjsNYi" alt=""><figcaption></figcaption></figure>

5. On the Installation Type screen, the Upgrade option is selected,

<figure><img src="/files/65dewenVQHPa2I4UseVf" alt=""><figcaption></figcaption></figure>

6. No changes are made on the database settings screen and next is clicked.

<figure><img src="/files/rq1bFWE8NDAJGo7rrKGa" alt=""><figcaption></figcaption></figure>

7. If there is no error on the Prerequisites screen, click Next,

<figure><img src="/files/6ojxHaVELiNKgqzv2uX3" alt=""><figcaption></figcaption></figure>

8. When the upgrade is completed successfully, the wizard is closed by clicking Close. The version of the product has been upgraded.

<figure><img src="/files/JD2CROnYBDxPZiriHomz" alt=""><figcaption></figcaption></figure>


# Easy2Patch Backup & Restore

Scope: Easy2Patch 4.0

## Backup Easy2Patch 4.0

It is important to back up the Easy2Patch software periodically. This backup will allow the failed server to be restored. With backup, all configurations, certificates, and software inventories sent to the ConfigMgr/WSUS/Intune system are protected. The data that needs to be backed up and how to back them up are explained below.

There are 3 backup parts: These backups will be taken under a single folder and this folder will be backed up by the central backup system. If the backup of the server used is taken apart from manual backup, all components can be recovered at once. The backup steps and files to be backed up with manual or specially created jobs are explained below. The order of operations is not important. Although it is not necessary to stop the service, it is recommended to stop the service so that the data does not change.

1. Download folder containing downloaded 3rd Party software.
2. Code signing certificate
3. Database

<figure><img src="/files/COHvpLpk35BFAHEqfjvs" alt=""><figcaption><p>Stop service from Schedule Pane</p></figcaption></figure>

### Backup Downloaded Files

The 3rd Party installation files downloaded by Easy2Patch are located in the address specified by Download Path under General Settings. There is a folder named Download in the root directory of the selected drive. This folder should be backed up.

<figure><img src="/files/l8THTqR6Jjw5AZH5tRJE" alt=""><figcaption><p><strong>C:\</strong> Drive used for downloaded files</p></figcaption></figure>

### Backup Code Signing Certificate

The Code Signing certificate used by WSUS must be backed up in case it needs to be signed again after rollback. This certificate is located in the **LocalMachine\TrustedPublishers** container and must be backed up with the private key.

<figure><img src="/files/7vW5Mf4PJOaBLf2UAlZz" alt=""><figcaption><p>Export Selected Certificate</p></figcaption></figure>

### Backup Database

Easy2Patch 4.0 stores all configuration data in the SQL Server database. Important data such as information about deployed applications and superseded relationships between resubmitted applications are stored in the database. Database backup can be taken with a job you define on the SQL Server agent, manually or with backup software. The backup file with the bak extension should be stored in a separate location with other backups. The following SQL script can be used to take backups. You should change the *C:\SQL\BACKUP* path to a folder path in your environment.

```sql
BACKUP DATABASE [Easy2Patch] TO  DISK = N'C:\SQL\BACKUP\Easy2Patch.bak' 
WITH NOFORMAT, INIT,  NAME = N'Easy2Patch-Full Database Backup', 
SKIP, NOREWIND, NOUNLOAD,  STATS = 5
```

## Restore Easy2Patch 4.0

After reinstalling Easy2Patch for various reasons, it is necessary to restore old data. When you restore the data, the system will continue where it left off. For this purpose, you need to perform a normal Easy2Patch installation before the restore. It should be noted that if Easy2Patch is installed on a newly installed operating system (different from the server it is licensed for), the license will not come with the restore. In order for the license to be activated, <sales@easy2patch.com> or <support@easy2patch.com> must be contacted. The following backups should be restored in order. As in the backup, the service should be stopped during the restore. The service should be restarted after the operations are completed.

* Download folder containing downloaded 3rd Party software.
* Code signing certificate
* Database

### Installing Easy2Patch 4.0 on a New Machine

Install Easy2Patch 4.0 software as if you were doing a new installation. If the database is already installed on SQL Server, you should delete it. Complete all your configurations with the **FTW** wizard that will be run after the installation. For installation procedures, see. [Installing Easy2Patch 4.0](/deployment/installing-easy2patch-4.0).&#x20;

### Restore Downloaded Files

The backed up download folder is copied to the root directory of the drive selected on the settings screen. For example: **D:\Download**.

### Restore Easy2Patch Database

Easy2Patch database must be restored from SQL management interface. The following T-SQL can be used for restore. If a backup was taken with a backup software, the restore process must be done through this software.

The T-SQL script that can be used for Manual Restore will be as follows. Change the path of the backup (bak) file according to your system.

{% hint style="warning" %}
The SQL Server version must be equal to or higher than the version of the backup system. Otherwise, you cannot restore the database.
{% endhint %}

```sql
USE [master]
ALTER DATABASE [Easy2Patch] SET SINGLE_USER WITH ROLLBACK IMMEDIATE
RESTORE DATABASE [Easy2Patch] FROM  DISK = N'C:\SQL\BACKUP\Easy2Patch.bak' WITH  FILE = 1,  NOUNLOAD,  REPLACE,  STATS = 5
ALTER DATABASE [Easy2Patch] SET MULTI_USER
GO
```

{% hint style="info" %}
After the database restoration process is completed, you can complete the licensing process.
{% endhint %}

### Restore Code Signing Certificate

Finally, the code signing certificate must be imported. Click the import button under Settings\Management\Certificate, select the backed up code signing pfx file, and enter the certificate's password to complete the process.

<figure><img src="/files/cqmLmJlHtM9IbiDTtZxN" alt=""><figcaption></figcaption></figure>


# Licensing Easy2Patch 4.0

Scope: Easy2Patch 4.0

{% embed url="<https://www.youtube.com/watch?v=lLBq942ZZxM>" %}

Registration and license key procedures to use Easy2Patch 4.0 software are explained below.

1. Open Easy2Patch web portal from your browser.
2. Login with root or any other Easy2Patch administrator account,

<figure><img src="/files/SgFMwC9mma5PMihCmarA" alt=""><figcaption></figcaption></figure>

3. Make sure the server has Internet access and can go to [**https://license.arksoft.com.tr**](https://license.arksoft.com.tr).
4. Go to License under settings page,
5. Click the **Register Now** button. Fill in the information on the screen and press the Submit button.

<figure><img src="/files/2arAHGr0sHlpETWGvfL9" alt=""><figcaption></figcaption></figure>

6. A verification code consisting of 6-digit numerical values will be sent to the E-Mail address you entered. Enter this code on the screen that will appear on the screen.

<figure><img src="/files/uHV9jLvdhbk9udtJTzod" alt=""><figcaption></figcaption></figure>

7. After this process, the **Request a Demo** button will be activated. When you press this button, an inactive demo license will be created for you. The product key for this license will be contacted by the Easy2Patch team and sent to manually you via e-mail.

<figure><img src="/files/7A2JB9besgkp87TqooHM" alt=""><figcaption></figcaption></figure>

8. Enter the product key sent to you by the Easy2Patch sales team on the screen that appears by pressing the **License Key Confirm** button. The product is ready for use so that all its features can be used for 30 days.

<figure><img src="/files/3LlZlFsAgE0u76aEU074" alt=""><figcaption></figcaption></figure>

<figure><img src="/files/5XSmoLhobWxGzsvTXneK" alt=""><figcaption></figcaption></figure>


# Configuring

Scope: SessionAudit 1.0


# SSL Configuration in WSUS for 3rd Party Update

Scope: Easy2Patch (All Versions)

{% embed url="<https://www.youtube.com/watch?v=3OoKLsJCJkc>" %}

To deploy 3rd party updates with WSUS and/or SCCM, SSL configuration on WSUS is required. Below are the steps to be done on WSUS and SCCM.

1. Request SSL certificate for WSUS,
2. WSUS Website configuration,
3. Convert WSUS to SSL with WSUSUtil,
4. 3rd Party settings on SCCM,
5. Notification of WSUS address broadcast over SSL to client computers

## Request SSL certificate for WSUS

SSL Certificate is required for the website where WSUS Web service is published. This certificate can be obtained from a trusted authority or corporate CA server. The certificate must be an HTTPS SSL certificate and must be in a format suitable for common security levels. Fields such as Common Name, Subject Name of the certificate must contain the FQDN (for example WSUSServer.domain.com) name of the WSUS server.

## WSUS Website Configuration

Assign SSL Certificate for WSUS Web Site in Internet Information Services snap-in. give SSL sertificate for binding of Secure Port (for example: 8531 or 443)&#x20;

![](/files/L4oMnUf3svoxwJoN6Ia5)

Select **Require SSL** for the following applications of WSUS Site.

* ApiRemoting30
* ClientWebService
* DssAuthWebService
* ServerSyncWebService
* SimpleAuthWebService

![](/files/f6VcBiZ0ZEFTHwDmVtjG)

![](/files/6p79oLpFgn2zzI6DEoKm)

## Convert WSUS to SSL with WSUSUtil

WSUSUtil tool used for converting WSUS Service from or to SSL/NonSSL. Following command should be running on WSUS server with administrative priviledge. When you open command line, open as administrator option should use.

WSUSUtil placed in WSUS installation folder. generally this tool exist under "C:\Program Files\Update Services\Tools"

```batch
wsusutil configuressl wsusserver.domain.com
```

wsusserver.domain.com address should replaced with your wsus servers FQDN name. &#x20;

![](/files/Qcd4WQZdkBEK7hPL9Q0I)


# Configuring ConfigMgr for 3rd Party Updates

Scope: Easy2Patch (All Versions)

{% embed url="<https://www.youtube.com/watch?v=x-tXIYJSvP4>" %}

## 3rd Party settings on ConfigMgr

Go to Administration\Overview\Site Configuration\Servers and Site System Roles node and enter Properties screen with right click on Software Update Point role, then select **"Require SSL communication to the WSUS server"** check box and OK button.

To require SSL communication to the WSUS server for SCCM 3rd party updates, you can follow these steps:

1. Open the Configuration Manager console and go to Administration > Site Configuration > Servers and Site System Roles.
2. Select server that contains Software Update Point role.
3. In the site system roles pane select Software Update Point role and click properties in right click menu.
4. Select the site that you want to configure, and click on "Configure Site Components" in the ribbon.
5. Go to the "General" tab.
6. Check the box that says "Require SSL communication to the WSUS server".
7. Click "OK" to save the changes.

![](/files/2kSrhyzLXLA2vIuqdr0C)

To configure other settings for 3rd party updates in SCCM, you can follow these additional steps:

1. Open the Configuration Manager console and go to Administration > Site Configuration > Sites.
2. Select the site that you want to configure, and click on "Configure Site Components" in the ribbon.
3. Click on "Software Update Point", go to the "Third Party Updates" tab.
4. Check the box that says "Enable third party updates".
5. In the same screen select "Manually manage the certificate" option.&#x20;
6. Click "OK" to save the changes.

You can also configure additional settings for individual third-party update sources by selecting the "Third-Party Update Catalogs" node in the Configuration Manager console and then selecting the catalog that you want to configure. From there, you can configure settings such as proxy server settings, download location, and update categories.

![](/files/w5mTfv3ZR6iBPUdHMzs9)

### Client Settings

Finally enable 3rd Party updates on clients. For this go to "Client settings" node on Administration pane.

1. On the client settings screen, right-click on "Default Client Settings" or the appropriate client update policy and the properties screen opens.
2. Software updates screen is displayed. On this screen, "Enable third party software updates" is selected as "Yes".&#x20;
3. Click OK to save the settings.

![](/files/p5lxrYnzfv2ekZVUhJgI)

**Administration > Client Settings > Default Client Settings > Properties > Computer Agent > PowerShell execution policy**

In this section, set the value to **Bypass**, then click **OK** to save the configuration.

<figure><img src="/files/0iDEVZRtRr2QCczPQwZl" alt=""><figcaption></figcaption></figure>


# Easy2Patch 3.1 Settings

Scope: Easy2Patch 3.1

Easy2Patch settings are made with the following steps.

1. Certificate Management
2. WSUS Settings
3. SCCM Settings
4. Database Settings
5. Intune Settings
6. Application Deployment
7. Intune Deployment
8. General Settings
9. Notification
10. Proxy


# General


# Certificate Management

Scope: Easy2Patch (All versions)

## Certificate Management

1. The certificate management screen is opened by going to Settings > General > Certificate Management.
2. Certificates with a wildcard (\*) from the Selected Certificate list are eligible certificates. This certificate is the certificate obtained in the Code signing certificate generation step.
3. Another method of selecting the code signing certificate, if the PFX version of the certificate is available, click the Import Certificate button.
4. On the Open screen, the certificate with the PFX extension is selected and opened,
5. Enter the password of the PFX certificate in the pop-up window and click OK.

Code Signing certificate imported with one of these 2 methods will be the certificate that WSUS software will use. Valid is written in the Certificate Status field, and the validity period of the certificate is written in the Expiration Date field. These areas are shown in green.

<figure><img src="/files/g5nBj8FSBX51tWFQIJTy" alt=""><figcaption><p>A code-signing certificate installed in the system can be selected from the list.</p></figcaption></figure>

<figure><img src="/files/RRKzIeM5qqHfQq7Dvkth" alt=""><figcaption><p>Certificate Management</p></figcaption></figure>

**Import Certificate**: It is used to import Code-Signing certificate with PFX extension. You need the password of the certificate when importing the PFX file. After the certificate is imported, the configuration must be saved by clicking the save button.

**Generate Self-Signed**: It is used to manually generate the required Code-Signing certificate for WSUS. This certificate needs to be distributed to all client systems manually or via GPO. You can export the certificate with the Export Certificate button. After the certificate is generated, the configuration must be saved by clicking the save button.

**Show Certificate**: It is used to display the properties of the selected and loaded certificate.

**Export Certificate**: It is used to export the selected and loaded certificate for Code-Signing for backup purposes. When exporting the certificate, a password must be specified as it will be exported together with the private key. It is important that this password is not forgotten. You will need this password during the import process.

## Timestamp Server

A timestamp server, also known as a time-stamping authority (TSA), is a trusted third-party service that provides a digital timestamp to a document, file, or message.

A digital timestamp is a cryptographic hash of the data that is encrypted with a private key owned by the timestamp server. This encrypted hash is then attached to the original data, allowing anyone who has the public key of the timestamp server to verify that the data existed at a specific point in time and has not been altered since then.

The purpose of a timestamp server is to provide a way to prove the integrity and authenticity of electronic records and documents over time, even if the original digital signatures or certificates expire or become invalid. This is especially important in industries such as finance, legal, and healthcare, where records must be kept for long periods of time and need to be verifiable.

Timestamp servers are typically used in conjunction with digital signature software, where a user signs a document using their private key and the timestamp server provides a digital timestamp to the signed document. This ensures that the document was signed at a specific point in time and has not been altered since then.

A desired timestamp server is selected from the Timestamp Server URL list. It is important that this address is accessible. It can be understood that it is accessible by pressing the ping button. Attention, the addresses shown here may not be page addresses that can be opened via browsers. They are services that run over TCP 80 and TCP 443.

{% hint style="info" %}
The computer with SCCM Site Server, WSUS and Easy2Patch installed must have access to the selected timestamp address.
{% endhint %}

<figure><img src="/files/GgRrwRy3wKdUSDiUQ0d9" alt=""><figcaption><p>Timestamp Management</p></figcaption></figure>

You can any Timestamp server from the list and then click save button. The connection test to the timestamp server can be done with the ping button. Its important that the timestamp server address looks like a web address but a web page may not be published here. Timestamp server is a service that broadcasts on TCP ports 80 or 443.


# Backup Settings

Scope: Easy2patch 3.x Versions

<figure><img src="/files/eB8rAznEZPjyJXIAdwgV" alt=""><figcaption></figcaption></figure>

**Backup Settings**

Bu ekran, **Easy2Patch** yapılandırmasının yedeğini almak ve gerektiğinde geri yüklemek için kullanılır. Alınan yedek; uygulama ayarlarını, yapılandırma dosyalarını (config), veri dosyalarını ve log kayıtlarını içerir.

**Backup Path**

Yedek dosyasının oluşturulacağı klasör yolunun belirtildiği alandır. Oluşturulan backup dosyası bu dizine kaydedilir.

**Certificate Password**

Yedek dosyasını korumak amacıyla kullanılacak şifre alanıdır. İstenilen herhangi bir parola girilebilir. Bu parola, geri yükleme (Restore) işlemi sırasında da kullanılacaktır.

**Include Download Folder**

İşaretlenmesi durumunda, indirilen paketlerin bulunduğu klasör de yedekleme işlemine dahil edilir.

**Backup**

Belirlenen **Backup Path** ve **Certificate Password** bilgileri girildikten sonra **Backup** butonuna tıklanarak yedekleme işlemi başlatılır. İşlem tamamlandığında Easy2Patch ayarları, yapılandırma dosyaları, veri dosyaları ve log kayıtlarının yedeği oluşturulur.

**Open Backup Folder**

Oluşturulan yedek dosyasının bulunduğu klasörü açar.


# Restore Easy2Patch 3.x

Scope: Easy2Patch 3.x Versions

**Restore Settings**

**Restore Path**

Geri yükleme işleminin yapılacağı Easy2Patch kurulum dizinidir.

**Certificate Password**

Yedek alınırken kullanılan parola bu alana girilmelidir. Yanlış parola girilmesi durumunda geri yükleme işlemi gerçekleştirilemez.

**Include Download Folder**

Yedek içerisinde bulunan indirilen paketlerin de geri yüklenmesini sağlar.

**Restore**

Daha önce alınmış backup dosyası kullanılarak Easy2Patch ayarları, yapılandırma dosyaları, veri dosyaları ve log kayıtları geri yüklenir. Restore işlemi tamamlandıktan sonra uygulamanın yeniden başlatılması önerilir.


# General Settings

Scope: Easy2Patch (All versions)

This is the screen where Easy2Patch general settings are made.

**Auto Self Update**: Allows Easy2Patch to automatically update itself when a new version is released. The current version of Easy2Patch can be followed on the About screen. Default setting

**Download Retry**: It is determined how many times Easy2Patch will repeat the download process if an error occurs while downloading the files. The default value is 2, it can be up to 4.

**Log Type**: Log Type: Application logs are collected under the Logs folder in the installation directory. Logs can be generated at 3 levels. It is produced at the Information level by default. From this screen, it is possible to produce a detailed log by taking it to the verbose level. Debug log level can be configured under the registry.

To configure the logging level, which records details about Easy2Patch events, edit the Log level value in the following registry key: HKLM\SOFTWARE\Arksoft Bilişim\Easy2Patch\
Log Level (Dword): 3

**Log File Size**: The largest size of the logs that Easy2Patch will produce is determined. When the log file reaches the size specified here, it is backed up with the lo\_ extension and a new log file is opened.&#x20;

The default value can be 2048 KB (2 MB), the minimum value is 16 KB, and the maximum value can be 8192 KB (8 MB).

**Download Path**: The catalog file Easy2Patch.zip is downloaded to this folder. Again in this folder, update files are downloaded under Temporary. Due to the large size of the updates to be downloaded, the driver may need to be oversized or this folder may need to be relocated. To move it to a drive other than the operating system, the (...) button is pressed and the folder path is changed.

**Extract Path**: It is the folder where all catalog files related to updates and applications are opened.

**Deployment Path**: The contents of the Easy2Patch.cab file required for WSUS deployments are extracted to this folder.

<figure><img src="/files/f5qHJr24QMnzKhGWYHHH" alt=""><figcaption><p>General Settings</p></figcaption></figure>


# Application Deployment

Scope: Easy2Patch (Advanced Licensing)

Easy2Patch integrates with Microsoft Endpoint Manager (aka. ConfigMgr) to distribute applications in its catalog. The automatic creation and distribution of packages and the setting of distribution methods are set from this screen.

**Auto Deployment**: This option is selected for automatic deployment of the application.

**Deployment Type Content Folder**: UNC path is needed for deploying applications in ConfigMgr. The UNC path to which the applications to be distributed will be copied is entered in this field. This shared folder must be given read and write rights to the account set up for Easy2PatchSvc.

**Deployment Type Slow Handling Mode**: Specify if clients should download the application when they use a distribution point from a neighbor or the default site boundary groups.

**Target Collection**: The Collection in which the application will be deployed automatically is selected.

**Distribution Point**: Applications must be distributed to Distribution Points in order to be distributed on ConfigMgr. By pressing the **(...)** button, the Distribution Points in the system are selected.

**Distribute While Publishing**: Easy2Patch provides automatic distribution to the selected distribution points during the publishing process.

**Deployment Purpose**: It is the setting related to the distribution of the deployed application to user computers. Required option for Automatic installation, Available for user-selective installation in Software Center.

**Application Publish Options**: For the products in the catalog, the change method of the existing distribution is determined every time a new version is released. The *Overwrite* option determines that the application will be updated with the new version information and the distribution will continue with the same package. The other option retires the existing application and allows the new version application to be sent as a new package.

<figure><img src="/files/s2TDeaGq2EN237u37AjH" alt=""><figcaption><p>Application Deployment</p></figcaption></figure>


# Intune Deployment

Scope: Easy2Patch (Enterprise Licensing)

Easy2Patch integrates with Intune to distribute applications in its catalog. The automatic creation and distribution of packages and the setting of distribution methods are set from this screen.

**Auto Assignment**: This option is selected for automatic deployment of the application.

**Azure Groups**: Select Azure Groups in which the application will be deployed automatically.

**Deployment Purpose**: It is the setting related to the distribution of the deployed application to user computers. Required option for Automatic installation, Available for user-selective installation in Company Portal.

**Application Publish Options**: For the products in the catalog, the change method of the existing distribution is determined every time a new version is released. The *Overwrite* option determines that the application will be updated with the new version information and the distribution will continue with the same package. The other option retires the existing application and allows the new version application to be sent as a new package.

<figure><img src="/files/lfxH9utt9EXGSrK2Bgjh" alt=""><figcaption></figcaption></figure>


# Maintenance

**Clean Supersededs**: Updates with new versions are automatically marked as supersed. Information about these updates is kept in the WSUS database. The Clean Superseds button cleans the database.&#x20;

**Cleanup**: WSUS **Server Cleanup Wizard** işlemini başlatır. İşlem sırasında artık kullanılmayan bilgisayar kayıtları, kullanılmayan güncellemeler ve gereksiz güncelleme dosyaları temizlenir. Bu işlem, sunucudaki gereksiz verileri kaldırarak disk kullanımını azaltır ve WSUS veritabanının daha verimli çalışmasına yardımcı olur.

**Clean Temporary Folder**: It is used to clean the temporary directory where Easy2Patch updates are downloaded.&#x20;

**Clear Cache**: In case of an error during the publishing process, it enables the publishing process to be stopped and started again.


# Notification

Scope: Easy2Patch (All versions)


# E-Mail

Scope: Easy2Patch (All versions)

With the rules to be defined on Easy2Patch, important events can be reported to system administrators via e-mail. Detailed configuration steps about E-Mail notifications are explained.

<figure><img src="/files/D23Q4ggzqWrt8sAuUK3I" alt=""><figcaption><p>E-Mail Settings</p></figcaption></figure>

**Server Name**: SMTP Server name.&#x20;

**TLS**: If the secure channel is to be used, TLS must be checked.

**Port**: TCP port number used by the SMTP server.

**User E-Mail**: If authentication is to be used, an e-mail address must be entered as a user name.

**User Password**: Password is entered if authentication will be used.

**Authentication**: Specified User should be selected if it is desired to send an E-Mail using authentication. If authentication will not be used, relay right should be given to the server where Easy2Patch is installed on the mail server.

**Test E-Mail**: To test the E-Mail server settings, an e-mail address is entered in this field. This address is not saved. It is used for testing purposes only.

The settings are saved by pressing the **save** button.


# Telegram

Scope: Easy2Patch (All versions)

With the rules to be defined on Easy2Patch, important events can be reported to system administrators interactively via telegram. Detailed configuration steps about Telegram are explained. In order to perform these steps, an application can be obtained from "[Telegram for Windows](https://telegram.org/dl/desktop/win64)" or "[Telegram for Linux](https://telegram.org/dl/desktop/linux)". Likewise, mobile applications can be obtained from the "[Google Play Store](https://play.google.com/store/apps/details?id=org.telegram.messenger)" or "[Apple AppStore](https://apps.apple.com/app/telegram-messenger/id686449807)" to receive messages from smartphones.


# Creating a Telegram Bot

Scope: Easy2Patch (All versions)

BotFather is typed into the search field via Telegram and the Start button is pressed on the screen.

<figure><img src="/files/bhPyJmDfjxOYCR4Gi9ux" alt=""><figcaption><p>BotFather</p></figcaption></figure>

<figure><img src="/files/scTdhr2EJtp0tpQvyUWC" alt=""><figcaption><p>Start a bot</p></figcaption></figure>

The /newbot command is used to create a new bot.

* Enter a name for the bot. Ex: Easy2Patch
* Username is determined to access this bot. Username must be unique to you and not in use. Ex: **Easy2Patch\_bot**
* By clicking on the given address or as <http://t.me/Easy2Patch_bot>, you can go to the telegram address with your username. With this bot, you can share this address with the people you want to receive Easy2Patch alerts.
* After going to this address, the bot is started by pressing the Start button.

After the bot name is entered, the bot creation process is completed. With this process, the API Key created specifically for your bot is displayed on the screen. If you want to see the API Key value of the bot again later, you can use the **/mybots** command in the BotFather bot.

The API Key consists of a numeric value followed by an alpha-numeric expression separated by a ":" "colon".

ex: 1234567890:AAGhW0VD8k8a-dXbcht38rzS5fU5YQqWQ2A

This value is the address you will write in the API Key field in Easy2Patch Telegram settings.


# Telegram Chat ID

Scope: Easy2Patch (All versions)

As many people as you want can join the Telegram Bot you created in the previous article. Each participant will have a different ChatID. This ChatID value is personal and shows the Telegram address to be written for the recipients in the Alerts field.

In Telegram, you can go to the "Telegram Bot Raw" bot with the help of search. This bot is the bot that will show your Telegram information. While on this bot, the /start command is written.

The value in the Chat id field is the value created specifically for the person and is used as the Telegram address of the person in the recipients section.

<figure><img src="/files/kP5FTVnOAiONUBZjcBPL" alt=""><figcaption><p>Chat ID</p></figcaption></figure>


# SCCM / WSUS / INTUNE


# WSUS Settings

Scope: Easy2Patch (All versions)

Depending on the license, the SCCM/WSUS/INTUNE button in the ribbon menu is clicked on the Settings screen. WSUS settings are made from the WSUS Settings tab as follows:

1. In the Host address part, the server address of the SUP role is written as FQDN.
2. Select the Use SSL button
3. Enter the Secure Port value configured in WSUS in the Port field. By default it is 8531. But it could be 443 or any other port.
4. The connection test is performed by pressing the test button. If the test is successful, a question about saving the record is asked. Yes is clicked.

WSUS Secure Port is the HTTPS port used by the WSUS server. By default, WSUS uses the Secure Port as 8531.

To verify which port the WSUS server is using, you can follow these steps:

1. On the WSUS server, open IIS Manager.&#x20;
2. In the left-hand panel, expand the "Sites" node and click on the "WSUS Administration" site.&#x20;
3. On the page that opens, click on "Bindings" in the "Actions" section on the right.&#x20;
4. In the window that opens, click the "Edit" button next to the port specified as "https" in the "Type" column.&#x20;
5. In the window that opens, in the "Port" field, you can see the WSUS Secure Port number.&#x20;

By following these steps, you can find out the secure port used by the WSUS server.

## Size limit for WSUS Update Publishing

WSUS server has a maximum size limit. Some update packages may exceed the size limit. When you want to deploy updates larger than 384 MB  You shouldn't do that in general. Updates can't be published to the WSUS server due to the locally published packages size limit. The WSUS package size limit is 382 MB by default.

You can change the default size limitation in 2 ways.

First method is, you can change the maximum file size from registry. When you run the powershell script, maximum file size for publishing updates in wsus changed to 512 MB. Maximum file size for publishing is 2047 MB.

```powershell
[reflection.assembly]::LoadWithPartialName("Microsoft.UpdateServices.Administration")
$wsus = [Microsoft.UpdateServices.Administration.AdminProxy]::GetUpdateServer()
$size = $wsus.GetConfiguration().LocalPublishingMaxCabSize
Write-host "Current Max Size" $size
$config = $wsus.GetConfiguration()
$config.LocalPublishingMaxCabSize = 512
$config.save()
```

You can change this value easily in Easy2Patch Console. Change Local Publishing Max Size (MB) value to 512 and then click submit button.&#x20;

<figure><img src="/files/G1bscdjnIFDd2XAUBerH" alt=""><figcaption><p>Local Publishing Max Size (MB)</p></figcaption></figure>


# SCCM Settings

Scope: Easy2Patch (All versions)

Depending on the license, the SCCM/WSUS/INTUNE button in the ribbon menu is clicked on the Settings screen. SCCM settings are made from the "SCCM Settings" tab as follows:

1. In the Provider Server part, the server address of the SCCM Site System Role is written as FQDN or NetBIOS name.
2. Select the Local System radio button to connect SCCM via SUP Roles machine account.&#x20;

If the service account is desired to be used instead of the machine account, the Service Account option is selected. When the service account is selected, an account with the necessary authorizations on the SCCM server is written in the User Name and Password fields.

SCCM rights for Service Account

1. **Application:** Read, Modify, Delete, Set Security Scope, Create, Move Object, Modify Folder
2. **Distribution Point:** Read, Copy to Distribution Point
3. **Distribution Point Group:** Read, Copy to Distribution Point Group
4. **Folder Class:** Read, Modify, Create
5. **Security Scopes:** Read
6. **Site:** Read
7. **Software Updates:** Read, Modify


# Database Settings

Scope: Easy2Patch (All versions)

On this screen, ConfigMgr database server, instance and database name information is entered. If these settings are entered, ConfigMgr software inventory is compared with the Easy2Patch catalog. How many are installed next to each product is shown.

<figure><img src="/files/VaDx915QYgzYycnZSirh" alt=""><figcaption><p>Update Statistics</p></figcaption></figure>

In order to make the settings, go to the Settings\SCCM/WSUS/INTUNE\DatabaseSettings screen.

**Data Source**: Enter Database server name.

**Initial Catalog**: Enter ConfigMgr Site Database name (e.g. **CM\_**&#x58;YZ).&#x20;

**Authentication Type**: Select Integrated or SQL authentication model that used in SQL Server Security model.

**User Id**: If the SQL authentication model is selected, the authorized user account that can connect to the ConfigMgr database is entered on the database server. No AD or Windows account is entered here. Only the SQL account must be entered.

**Password**: If the SQL authentication model is selected, the password of the authorized user account that can connect to the ConfigMgr database on the database server is entered. No AD or Windows account is entered here. Only the password of the SQL account must be entered.

The test button is used to test the connection and save if successful. After all the information is entered, it should be saved by clicking the Save button.


# Intune Settings

Scope: Easy2Patch (Enterprise Licensing)

In order to use the Intune feature, Easy2Patch version 3.0 and Demo or Enterprise license are required. For support on Update and Licensing, please email <support@easy2patch.com>.

[AppRegistration ](/deployment/configuring-intune-application-registration)steps must be completed first for Intune configuration. Access the [App Registrations](https://portal.azure.com/#view/Microsoft_AAD_RegisteredApps/ApplicationsListBlade) page from the Azure portal page. Copy the Application (Client) ID and Directory (tenant) ID values on this screen.

<figure><img src="/files/1DMSqzjyDgyvazYXMaox" alt=""><figcaption><p>App Registrations values</p></figcaption></figure>

<figure><img src="/files/wpl1O5MQy4oQkZApProK" alt=""><figcaption></figcaption></figure>

1. Open Settings\SCCM/WSUS/INTUNE\Intune Settings in Easy2Patch.
2. Type or paste the values you copied earlier as indicated below.

* Tenant Id:&#x20;

<figure><img src="/files/tbShPSrxknz4N3rKhTNS" alt=""><figcaption></figcaption></figure>


# Proxy

Scope: Easy2Patch (All versions)

Easy2Patch downloads catalogs and updates from the Internet. If the server's internet access is provided through a proxy, the following settings should be made.

<figure><img src="/files/WH88KHM5wr2dDerr5RWv" alt=""><figcaption><p>Proxy Settings</p></figcaption></figure>

* Use Proxy: If a proxy is desired, **Use Proxy** is selected.
* Server: Enter the proxy server address. Enter the IP Address or server name.
* Port: The port number that the proxy server uses for the proxy is entered.
* Authentication: If the proxy server wants authentication, the **Authenticated** option is selected.
* User Name: If authentication is to be used, a user name authorized to access the internet from the proxy server is entered in this field.
* User Password: Enter the password of the user account to be used for proxy access.


# Easy2Patch 4.0 Settings

Scope: Easy2Patch 4.0

Easy2Patch settings are made with the following steps.

1. General Settings
2. Identity Settings
3. Certificate Management
4. WSUS Settings
5. SCCM Settings
6. Database Settings
7. Intune Settings
8. Application Deployment
9. Intune Deployment
10. Notification
11. Proxy


# Migrate from Easy2Patch 3.x

Scope: Easy2Patch 4.0

Bu bölüm, \*\*Easy2Patch 3.x\*\* sürümünde bulunan mevcut yapılandırma ayarlarının \*\*Easy2Patch 4.0\*\* sürümüne aktarılması için kullanılır. Böylece önceki sürümde yapılan ayarlar yeniden yapılandırılmadan yeni sürüme taşınabilir.

&#x20;

\## Ön Koşullar

&#x20;

\* Easy2Patch \*\*4.0 kurulumu\*\* tamamlanmış olmalıdır.

\* Easy2Patch 3.x kurulum dizinindeki \*\*ClientSettings\*\* dosyası erişilebilir durumda olmalıdır.

&#x20;

\---

&#x20;

\## Kullanım Adımları

&#x20;

1\. Easy2Patch \*\*4.0\*\* kurulum adımlarını tamamlayın.

&#x20;

2\. Eski Easy2Patch 3.x kurulum dizinine gidin.

&#x20;

&#x20; \`\`\`

&#x20; C:\Program Files\Easy2Patch\Settings

&#x20; \`\`\`

&#x20;

3\. Bu klasörde bulunan \*\*ClientSettings\*\* dosyasını tespit edin.

&#x20;

4\. Easy2Patch 4.0 yönetim panelinde \*\*General Settings > General\*\* ekranını açın.

&#x20;

5\. \*\*Import Settings\*\* butonuna tıklayın.

&#x20;

6\. \*\*ClientSettings\*\* dosyasını seçerek içe aktarma (Import) işlemini başlatın.

&#x20;

7\. İşlem tamamlandığında önceki sürümde kullanılan tüm yapılandırma ayarları Easy2Patch 4.0 ortamına aktarılmış olacaktır.

&#x20;

\---

&#x20;

\## Sonuç

&#x20;

İçe aktarma işlemi tamamlandıktan sonra Easy2Patch 3.x sürümünde kullanılan sistem yapılandırmaları, bağlantı ayarları ve diğer genel konfigürasyonlar Easy2Patch 4.0 üzerinde kullanılmaya hazır hale gelir. Böylece manuel yapılandırma ihtiyacı ortadan kalkar ve geçiş süreci hızlandırılmış olur.


# General Settings

Easy2Patch 4.0

Easy2Patch 4.0 settings are grouped under different categories. General settings related to Easy2Patch 4.0 are located under General Settings. However, there are some settings that cannot be made from the interface. Below are the settings made from local files.

The following settings can be edited in the appsettings.json file in the Easy2Patch 4.0 Web Edition installation directory.

Since the following settings are changed in the **appsettings.json** file, IIS must be restarted after the changes are made. Otherwise, the settings will not become valid and it will continue to work with the old settings.

## AccessTokenExpiration

Determines the session duration of the user logging in to the web portal. It is in minutes and defaults to 60 minutes. Shortening the time will make usage more difficult and increase safety. If the period is extended, it will reduce the need to log in during the day. However, in this case, an accidentally forgotten session will remain open during this period.

## Hangfire

Easy2Patch 4.0 uses hangfire .net core service technology instead of Windows Service to perform scheduled tasks in the background. By typing /hangfire at the end of the address where the Web Portal is published, the tasks, working times and results of the service can be seen. Manual triggering operations can also be performed if desired.

### HangfireUserName

This is the username to be used to enter the Hangfire interface. It defaults to **"admin"**.

### HangfirePassword

This is the password to be used to enter the Hangfire interface. By default it is **"admin"**.

### IsServiceRun

Sets the default state of the Hangfire service when IIS starts. If the value here is true, the Hangfire service starts when IIS starts. If set to false, the hangfire service will not start automatically when IIS starts. It must be started manually from the Schedule tab.

## ConnectionStrings\Easy2PatchDb

Easy2Patch 4.0 uses the database in SQL Server. The connection string to this server is defined in this field. The information entered in this field is automatically encrypted after IIS runs.

### SQL Server with default instance and with SQL Authentication

```
"Data Source=SERVERNAME; Initial Catalog=Easy2Patch; user Id=UserName;password=Password; pooling=true; TrustServerCertificate=True;"
```

### SQL Server with an instance and with SQL Authentication

```
"Data Source=SERVERNAME\Instance; Initial Catalog=Easy2Patch; user Id=UserName;password=Password; pooling=true; TrustServerCertificate=True;"
```

### SQL Server with default instance and with Integrated Authentication

```
"Data Source=SERVERNAME; Initial Catalog=Easy2Patch; Trusted_Connection=True; pooling=true; TrustServerCertificate=True;"
```

### SQL Server with an instance and with Integrated Authentication

```
"Data Source=SERVERNAME\Instance; Initial Catalog=Easy2Patch; Trusted_Connection=True; pooling=true; TrustServerCertificate=True;"
```

{% code title="appsettings.json" %}

```json
{
  "Loggings": {
    "LogLevel": null
  },
  "TokenOptions": {
    "Audience": "Easy2Patch A.Ş",
    "Issuer": "Easy2Patch",
    "AccessTokenExpiration": 1440,
    "SecurityKey": "Easy2Patch Web Portal Application",
    "ApplicationId": "9932948f-bead-4e18-8b72-fa9fb93be2c6"
  },
  "ConnectionStrings": {
    "Easy2PatchDb": "The encrypted string of the connection string to the Easy2Patch database appears in this field."
  },
  "IsShowSignalR": true,
  "AllowedHosts": [],
  "SCCMAndWsusSiteName": "ConfigMgr",
  "HangfireUserName": "EAAAAHvR2G2m8995rIkczIKQkQ18IutxohSOn4W5Qzf5lZpL",
  "HangfirePassword": "EAAAAEvAuFs9HWtrNK0qwEvPXdVQdwaKG8c9pPWylPoPBk3P",
  "Hangfire": {
    "IsServiceRun": true,
    "SetServiceCron": "0 */1 * * *",
    "IsRunSetOSManagedInfos": true,
    "SetOSManagedInfosCron": "0 12 * * *",
    "IsRunSetSoftwareInventoryInfos": true,
    "SetSoftwareInventoryInfosCron": "0 12 * * *",
    "IsSetSystemInfos": true,
    "SetSystemInfosCron": "0 12 * * *",
    "IsSetUpdateInfos": true,
    "SetUpdateInfosCron": "0 12 * * *",
    "IsSetClientUpdateMap": true,
    "SetClientUpdateMapCron": "0 12 * * *",
    "IsSetUpdateStatistic": true,
    "SetUpdateStatisticCron": "0 */3 * * *"
  }
}
```

{% endcode %}


# General

Scope: Easy2Patch (All versions)

This is the screen where Easy2Patch general settings are made.

**Download Path**: The catalog file Easy2Patch.zip is downloaded to this folder. Again in this folder, update files are downloaded under Temporary. Due to the large size of the updates to be downloaded, the driver may need to be oversized or this folder may need to be relocated. To move it to a drive other than the operating system, you can select any drive letter on Easy2Patch Server.

**Download Retry**: It is determined how many times Easy2Patch will repeat the download process if an error occurs while downloading the files. The default value is 2, it can be up to 6.

**Download File Max Time (Minute):** Specifies how long the downloading process for each file can take. Regardless of the success of the file's download, when the specified time has passed, the download of the file is interrupted and the download of the next update begins. The default value is 15 minutes, minimum can be set to 10 minutes and maximum value of this value is 360 minutes.

**Schedule Process Timeout (Hour)**: Specifies how long the downloading process for entire publishing process. Regardless of the success of the update file's download, when the specified time has reached, the catalog publishing is interrupted. The default value is 6 hours, minimum can be set to 4 hours and maximum value of this value is 12 hours.

**Trusted SSL Websites Only**: Some manufacturers release updates from HTTP sites. When this option is checked, applications from manufacturers publishing over HTTP will not be downloaded by Easy2Patch. Although it is recommended to download files safely from sites that publish over HTTPS, if you want to download 3rd party files from manufacturers that distribute via HTTP websites, the **Trusted SSL Websites Only** option will need to be turned off.

**Lock Up Time (Minute)**:&#x20;

**Number of Login Attempts:**&#x20;

Import Settings: If you are an Easy2Patch 3.0 or Easy2Patch 3.1 user, you can upgrade the configuration file to 4.0 with the Import Settings button. You can upgrade your old settings (including your license information -*only if you use the same server*-) to Easy2Patch 4.0. The settings of the Easy2Patch 3.x application are kept in the **Settings\ClientSettings.json** file in the installation directory.&#x20;

<figure><img src="/files/PrqpV2cEpx8HM9qq5rQG" alt=""><figcaption><p>General Settings\General</p></figcaption></figure>

After making the settings, you should save the settings by pressing the **Save** button.


# Identity


# Active Directory

Easy2Patch 4.0

Easy2Patch is Active Directory integrated software. User accounts in Active Directory can perform patch deployment and maintenance tasks in Easy2Patch. Easy2Patch supports multiple Active Directory domains.&#x20;

**UserPrincipalName** and **samAccountName** information can be used in user login operations. In addition to these 2 pieces of information, a different attribute can be used as username information. Users can also use custom attribute information in login operations.

<figure><img src="/files/zWzC9miTwuTdg9v9OoGw" alt=""><figcaption><p>Add Active Directory Domain</p></figcaption></figure>

## Create LDAP Connection

### Domain FQDN

Active Directory domain FQDN address is entered. This field supports entering the server name. It is recommended to enter Domain FQDN information. Example: domain.com

### Port/Secure

LDAP port information is entered. By default, Unsecure LDAP connection is TCP 389, Secure LDAP connection is TCP 636. If a special port is used, it must be entered in this field.

The Secure option determines the use of LDAP/Secure LDAP.

### Authentication (Username/Password)

When the Authentication option is selected, it is stated that a user account will be used for LDAP transactions. If the Authentication option is not selected, the user account specified for the IIS Application Pool is used for the operations specified below.

In the username field, the user account that will be connected to the Active Directory domain.

Test buttons are used to perform LDAP connection testing.

## Actions

### Info

Displays current Active Directory or EntraID connection informations. ![](/files/EZR6CFs3RvF0DCGqDn8r)

<figure><img src="/files/t6wAbLDEqFSEKAWs5vTd" alt=""><figcaption><p>Info Button</p></figcaption></figure>

### Test

Tests the Active Directory or EntraID connection using the information entered for the connection.![](/files/SlU9fAV03Y4kD9mmwiMu)

<figure><img src="/files/aOtYQpOq36K0sWWT67rn" alt=""><figcaption><p>Test Button</p></figcaption></figure>

### Edit

Used to change LDAP or EntraID connection settings. ![](/files/hA3kcF8gKG4SqGWIwPLw)

<figure><img src="/files/bOXFuICWRkHKb7wsb7jd" alt=""><figcaption><p>Edit Button</p></figcaption></figure>

### Delete

It is used to delete the Active Directory (LDAP) or EntraID connection in the relevant line.![](/files/krebrXJVc45nWdX2gtXN)

<figure><img src="/files/TQ68kEOybm2OUksPNQhz" alt=""><figcaption><p>Delete Button</p></figcaption></figure>


# EntraID

Easy2Patch 4.0

You can integrate Easy2Patch with Microsoft EntraID. When you do this, you will be able to log in to Easy2Patch with your user accounts defined on EntraID and with the permissions given to Easy2Patch.

**Display Name**: Enter a descriptive name for the EntraID tenant to be added. Ex: Company EntraID

**Tenant ID**: Directory (tenant) ID information of your AppRegistration in your Azure Subscription.

**Client ID**: Application (client) ID information of your AppRegistration in your Azure Subscription.

**Secret Key**: In order for applications to be used safely, a secret key or certificate must be assigned. The secret key is generated from the Secret section and entered into this field.&#x20;

<figure><img src="/files/qFsgGUaKOMDa4pzgYsST" alt=""><figcaption><p>Tenant ID and Client ID</p></figcaption></figure>

{% hint style="danger" %}
The secret key is shown on the screen only once. If you exit this screen, it will not be displayed again.
{% endhint %}

<figure><img src="/files/6tXu3kDIE1SeJD2kw7qb" alt=""><figcaption><p>Secret Key for Client ID (Application)</p></figcaption></figure>

<figure><img src="/files/1NbQGTqSiksUk5NLE6IO" alt=""><figcaption><p>Enter your application information for Azure EntraID Integration</p></figcaption></figure>


# Required Permissions for EntraID

Scope: Easy2Patch (All Versions)

General steps to configure application registration for Intune application management.

1. Sign in to the Azure portal ([https://portal.azure.com](https://portal.azure.com/)).
2. Select "Azure Active Directory" from the left-hand navigation menu.
3. Select "App registrations" under the Manage section.
4. Click on "New registration" to create a new application registration.
5. Enter a name for your application, choose the supported account types, and enter a redirect URI (if applicable).
6. After registering the application, note the Application ID and Tenant ID. These will be used later in the Intune application configuration.
7. In Intune, navigate to "Client apps" and select "App registration" from the left-hand navigation menu.
8. Click on "Add" to create a new app registration.
9. Enter the Application ID and Tenant ID from step 6 and click "Next".
10. Select the app management capabilities you want to configure, such as app protection policies and app configuration policies.
11. Complete the configuration and assign the app registration to users or groups as needed.

{% hint style="info" %}
Note that these steps are general and may differ slightly depending on your specific Intune configuration and requirements. Always refer to official documentation and best practices for guidance when configuring Intune application management.
{% endhint %}

## Microsoft Graph Permissions

You should give some permissions for manage applications in intune for Application registration. In the **Select permissions** table view, search for **"User", "GroupMember"** and **"Group"** and under those permissions, enable the following:

* **User.Read:** Sign in and read user profile
* **User.Read.All:** Read all users' full profiles

Then, search for **“GroupMember”**, **"Group"** and under Group permissions, enable:

* **GroupMember.Read.All:** View Azure AD groups to enable automatic application deployment
* **Group.Read.All**: Read all groups


# Proxy

Scope: Easy2Patch 4.0

Easy2Patch downloads catalogs and updates from the Internet. If the server's internet access is provided through a proxy, the following settings should be made.

<figure><img src="/files/paZ8od23r2cCvkB26veE" alt=""><figcaption><p>Proxy Settings</p></figcaption></figure>

* **Use Proxy**: If a proxy is desired, **Use Proxy** is selected.
* **Server**: Enter the proxy server address. Enter the IP Address or server name.
* **Port**: The port number that the proxy server uses for the proxy is entered.
* **Authentication**: If the proxy server wants authentication, the **Authenticated** option is selected.
* **User Name**: If authentication is to be used, a user name authorized to access the internet from the proxy server is entered in this field.
* **User Password**: Enter the password of the user account to be used for proxy access.


# Log

Easy2Patch 4.0

**Log Type**: Log Type: Application logs are collected under the Logs folder in the installation directory. Logs can be generated at 3 levels. It is produced at the Information level by default. From this screen, it is possible to produce a detailed log by taking it to the verbose level. Debug log level can be configured under the registry.

To configure the logging level, which records details about Easy2Patch events, edit the Log level value in the following registry key: HKLM\SOFTWARE\Arksoft Bilişim\Easy2Patch\
Log Level (Dword): 3

**Log File Size**: The largest size of the logs that Easy2Patch will produce is determined. When the log file reaches the size specified here, it is backed up with the lo\_ extension and a new log file is opened.&#x20;

The default value can be 2048 KB (2 MB), the minimum value is 16 KB, and the maximum value can be 8192 KB (8 MB).

<figure><img src="/files/Oidi1geWxCIhwOvK6uHS" alt=""><figcaption></figcaption></figure>


# Maintenance

Scope: Easy2Patch 4.0

**Unlock Publishing Jobs:** It allows you to cancel the current publish and start for a new publish operation. It is also used to interrupt publish processes that are thought to be suspended.

**Clear Cache**: In case of an error during the publishing process, it enables the publishing process to be stopped and started again.

**Clear Temporary Directory Path**: It cleans the installation files of downloaded and outdated 3rd party software. Recommended to free up disk space. It is a process that is performed automatically in the background with every sync operation.

**Clean Defender Tracking Data:** It ensures that the tracking data of computers with detected vulnerability records are deleted from the database.

**Clean Publish Log and Detail Log:** Cleaning the log records of published applications.

**Delete Temporary Directory Path:** Delete setup files under temporary directory.

**Clean Deleted Custom Product File:** Permanent deletion of records and files that have been defined as custom product.&#x20;

<figure><img src="/files/AaVp5FZ3Eq6no8hEdUL3" alt=""><figcaption></figcaption></figure>


# Login

Easy2Patch 4.0

You can make logins to the Easy2Path web portal more secure with 2-factor login and captcha. When you reach the Login screen under General Settings, 2 tabs will appear. The security measures in these tabs are disabled by default. You will need to turn on and configure these settings to optionally make logins more secure.

Authenticator applications frequently used on mobile devices can be preferred for 2-factor authentication.

## 2FA Settings

It is possible to generate codes using authenticator software running on the mobile device. You use this code to verify your identity in the Easy2Patch portal, in addition to the username and password.

**Use 2FA at Login**: You need to turn on this option to use it. If you turn it off, you will not be asked for a code when logging into the portal and you will log in directly.

**Stop Code Generation**: ToDo

**Failed Attempt**: It is used to prevent code entry in case of incorrect code entry. Default and minimum 3, maximum 10 can be given. It is used to prevent attackers from guessing the security code.

**Reset Timeout (minute)**: Determines the time period during which code entry will be blocked in case of incorrect code entry. Minimum and default 1, maximum 10 available.

<figure><img src="/files/1G3bD8ouq0tVmJXFFySw" alt=""><figcaption><p>2FA Settings</p></figcaption></figure>

{% hint style="info" %}
After completing the adjustments, you should save them by clicking the Save button.
{% endhint %}

## Captcha Settings

Sure! CAPTCHA (Completely Automated Public Turing test to tell Computers and Humans Apart) is a security mechanism designed to distinguish real users from automated bots on websites. CAPTCHA typically works by presenting simple tests that only humans can easily solve.&#x20;

Easy2Patch uses Text CAPTCHA. During login, users are required to enter the distorted text displayed on the screen into a text box.

Use CAPTCHA at Login: If you want to use CAPTCHA during login processes, this option should be enabled.

Captcha Expire Time (Second): Duration within which the CAPTCHA displayed on the screen must be entered into the text box. Once this time elapses, the CAPTCHA is refreshed, and the countdown restarts for the new CAPTCHA.

<figure><img src="/files/Jb3ukSkSxMmKlxfT6vZ0" alt=""><figcaption><p>Capthca Settings</p></figcaption></figure>

{% hint style="info" %}
After completing the settings, you should save them by clicking the **Save** button.
{% endhint %}


# Deployment Settings


# Process Conflict

**Process Conflict**, determines whether running processes will be terminated during the installation of the application on the end user computer.

## Default Process Confirm Type <a href="#default-process-confirm-type" id="default-process-confirm-type"></a>

There are 3 options:

### **Disabled:**

While an application is being installed on the end user's computer, if this application is running, it is not terminated. In this case, the application's setup file decides what to do. Since Easy2Patch does not send any information, failure to terminate the application may cause the installation to fail. The update is performed on the first restart of the target computer or when the application is closed.

### **Kill:**

While an application is being installed on the end user's computer, if this application is running, it will terminated. If the user tries to run the application being installed, Easy2Patch notifies the end user with a warning screen stating that this application cannot be opened.

### **Confirm:**

While an application is being installed on the end user's computer, if the programs of the installed application are running, Easy2Patch will display a warning screen and inform you that the application will be automatically terminated and the application will be updated after the specified time.

For the applications specified in the Process Names field, a key with the same name is opened under the registry key below and the application is prevented from running with a debug record.

**HKLM\SOFTWARE\Microsoft\Windows NT\CurrentVersion\Image File Execution Options**

## Process Kill Timeout <a href="#process-kill-timeout" id="process-kill-timeout"></a>

When the "Confirm" option is selected, the warning message to be sent to the end user is determined in this field. It is displayed for the specified period of time (**Process Kill Timeout**) and the application is terminated at the end of this period. A value in seconds is entered into this field. This value has a minimum 60 seconds and maximum 300 seconds.

## Default Process Confirm Message <a href="#default-process-confirm-message" id="default-process-confirm-message"></a>

When the "Confirm" option is selected, the warning message to be sent to the end user is determined in this field. It is displayed for the specified period of time (**Process Kill Timeout**) and the application is terminated at the end of this period.

<figure><img src="/files/8za8jCJOFGekGdhxwj10" alt=""><figcaption></figcaption></figure>


# Update

## **Options**

The options on the screen are divided into two categories: **Service** and **Manual**.

### **Service Options**

The Service options are managed automatically by the Hangfire scheduler service.

### **Manual Options**

It can be determined which of the following operations will be run in manual update publishing processes.

## Jobs

* **Trigger Synchronization:** This option controls whether the application or service should automatically trigger synchronization of Configuration Manager Update process. If this option is enabled, the schedule will trigger Configuration Manager after publishing updates complete.
* **Deleted Obsolete Updates:** This option controls whether the schedule should automatically delete obsolete updates from Easy2Patch local content folder. Obsolete updates are updates that have been superseded by newer updates. If this option is enabled, the schedule will periodically check its cache for obsolete updates and delete them.
* **WSUS Cleanup:** If this option is enabled, the schedule will periodically clean up its WSUS cache after publishing updates.
* **Clear Update Cache:** ToDo

{% hint style="info" %}
The Save button saves any changes that you have made to the options.
{% endhint %}

<figure><img src="/files/7rcfRCEwL9fr3MEsHjyd" alt=""><figcaption><p>Update Deployment Settings</p></figcaption></figure>


# Application Deployment

Scope: Easy2Patch (Advanced Licensing)

Easy2Patch integrates with Microsoft Endpoint Manager (aka. ConfigMgr) to distribute applications in its catalog. The automatic creation and distribution of packages and the setting of distribution methods are set from this screen.

**Auto Deployment**: This option is selected for automatic deployment of the application.

**Deployment Type Content Folder**: UNC path is needed for deploying applications in ConfigMgr. The UNC path to which the applications to be distributed will be copied is entered in this field. This shared folder must be given read and write rights to the account set up for Easy2PatchSvc.

**Deployment Type Slow Handling Mode**: Specify if clients should download the application when they use a distribution point from a neighbor or the default site boundary groups.

**Target Collection**: The Collections in which the application will be deployed automatically is selected.

**Distribution Point**: Applications must be distributed to Distribution Points in order to be distributed on ConfigMgr. By pressing the **(...)** button, the Distribution Points in the system are selected.

**Distribute While Publishing**: Easy2Patch provides automatic distribution to the selected distribution points during the publishing process.

**Deployment Purpose**: It is the setting related to the distribution of the deployed application to user computers. Required option for Automatic installation, Available for user-selective installation in Software Center.

**Application Publish Options**: For the products in the catalog, the change method of the existing distribution is determined every time a new version is released.&#x20;

The ***Overwrite*** option determines that the application will be updated with the new version information and the distribution will continue with the same package.&#x20;

The other option retires the existing application and allows the new version application to be sent as a new package.

**Clear Application Cache**: ToDo

<figure><img src="/files/K9mh3qBhYWql7CwKCjqx" alt=""><figcaption></figcaption></figure>


# Intune Deployment

Scope: Easy2Patch (Enterprise Licensing)

Easy2Patch integrates with Intune to distribute applications in its catalog. The automatic creation and distribution of packages and the setting of distribution methods are set from this screen.

**Auto Assignment**: This option is selected for automatic deployment of the application.

**Azure Groups**: Select Azure Groups in which the application will be deployed automatically.

**Deployment Purpose**: It is the setting related to the distribution of the deployed application to user computers. Required option for Automatic installation, Available for user-selective installation in Company Portal.

**Application Publish Options**: For the products in the catalog, the change method of the existing distribution is determined every time a new version is released. The *Overwrite* option determines that the application will be updated with the new version information and the distribution will continue with the same package. The other option retires the existing application and allows the new version application to be sent as a new package.

<figure><img src="/files/ghRH8GR7eXRuABnoUJUz" alt=""><figcaption></figcaption></figure>


# Defender

Scope: Easy2Patch (Enterprise License)

<figure><img src="/files/wboCZV0Wkr3yHwAVlnNu" alt=""><figcaption></figcaption></figure>

* **Disable/Enable:** This option enables or disables Easy2Patch's Defender integration.
* **Auto Assignment:** Use this option to allow Easy2Patch to automatically assign updates to azure groups that selected in **Azure Groups** option.
* **Azure Groups:** Select Azure Groups in this combo box to deploy updates.
* **Minimum Score:** Easy2Patch detects updates above the score specified here. Then, it scans through Intune to see if it is installed on the corporate systems. If it finds an installed application, Easy2Patch publishes updates regardless of whether a selection is made on the Update screen or not.
* **Deployment Purpose:** This option controls how Easy2Patch distributes updates. Options include:
  * **Available:** When application deployed to client computer or user, application don't install automatically. Is available to install for user in Company Portal.
  * **Required:** When application deployed to client computer or user, application install automatically. Install for user in Company Portal.

**Publishing Settings**

The publishing settings control how Easy2Patch publishes updates. These settings include:

* **Publish to WSUS:** This option allows Easy2Patch to publish updates to a Windows Server Update Services (WSUS) server.
* **Publish to Intune:** This option allows Easy2Patch to publish updates to Microsoft Intune.

**Publish Options**

* **Overwrite previously published application:** Easy2Patch overwrites older application and change all information with new one. Deployment and other application IDs will not changed.
* **If there is an old version application, retire it and send a new one:** This option allows Easy2Patch to retire an old update version and publish a new one.

{% hint style="success" %}
The **Save** button saves any changes you make to the settings.
{% endhint %}

**Note:** If one or more **Azure Groups** are selected, Easy2Patch scans only the devices that belong to the selected groups.

If no Azure Group is selected, Easy2Patch performs vulnerability scanning across all managed devices in the organization. Therefore, in the current configuration, since no Azure Group is selected, scanning is performed organization-wide.

&#x20;

**Note:** Easy2Patch evaluates only the applications that are identified as vulnerable by Microsoft Defender Vulnerability Management and have a publishable package available in the Easy2Patch catalog. For an application to be published automatically, it must not be excluded on the Defender screen, its highest CVSS score must be equal to or greater than the configured **Minimum Score**, and a publishable package must exist in the catalog. Applications that meet these conditions are published to Microsoft Intune and assigned to the selected Azure group. While the assignment is performed at the group level, the installation is evaluated on a per-device basis. If a device has an older version of the application installed, the update is deployed. If the application is not installed on the device or is already up to date, the device is reported as **Not Applicable**, and no installation is performed.

&#x20;

**Note:** Applications reported as vulnerable by Microsoft Defender Vulnerability Management may not always be deployed to client devices for several reasons. The first step is to verify whether the application has been published to Microsoft Intune. If the application does not exist in Intune, it may not have been published because a Defender mapping is not available in the Easy2Patch catalog, the application's highest CVSS score is below the configured **Minimum Score**, the application has been excluded on the Defender screen, no publishable package exists in the catalog, or the affected device has not reported data to Microsoft Defender for an extended period. If the application has been published to Intune but is not installed on client devices, this is typically the result of the per-device applicability evaluation. Devices where the application is not installed or is already up to date are reported as **Not Applicable**, and no installation is performed. Additionally, if **Deployment Purpose** is configured as **Available**, the application is not installed automatically and must be installed manually by the user through the **Company Portal**. To enable automatic deployment, **Deployment Purpose** should be configured as **Required**.

&#x20;


# Connection Settings


# Database

Scope: Easy2Patch 4.0

ToDo: Tamamla

Information collected in ConfigMgr and WSUS databases is used to create dashboards and reports.

### WSUS Database

{% embed url="<https://www.youtube.com/watch?v=RSDWc-jzmGk>" %}

### ConfigMgr Database

{% embed url="<https://www.youtube.com/watch?v=KkOhJGfDquY>" %}

### Dashboard View After Database Settings

{% embed url="<https://www.youtube.com/watch?v=pSu21mNkizg>" %}


# SCCM

Scope: Easy2Patch 4.0

{% embed url="<https://www.youtube.com/watch?v=Yz6srCWemWw>" %}

Depending on the license, the SCCM/WSUS/INTUNE screens in the settings page will appear. Configuration Manager settings are made from the "SCCM Settings" tab as follows:

1. In the Provider Server part, the server address of the SCCM Site System Role is written as FQDN or NetBIOS name.
2. Select the Local System radio button to connect SCCM via SUP Roles machine account.&#x20;

If the service account is desired to be used instead of the machine account, the Service Account option is selected. When the service account is selected, an account with the necessary authorizations on the SCCM server is written in the User Name and Password fields.

Configuration Manager rights for Service Account are;

1. **Application:** Read, Modify, Delete, Set Security Scope, Create, Move Object, Modify Folder
2. **Distribution Point:** Read, Copy to Distribution Point
3. **Distribution Point Group:** Read, Copy to Distribution Point Group
4. **Folder Class:** Read, Modify, Create
5. **Security Scopes:** Read
6. **Site:** Read
7. **Software Updates:** Read, Modify


# WSUS

Scope: Easy2Patch 4.0

{% embed url="<https://www.youtube.com/watch?v=uD5rAPPLvzs>" %}

Depending on the license, the SCCM/WSUS/INTUNE button is clicked in the settings page. WSUS settings are made from the WSUS Settings menu as follows:

1. In the Host address part, the server address of the SUP role is written as FQDN.
2. If WSUS is running securely, the use SSL option should be selected and the SSL port on which WSUS is running should be entered.
3. Enter the Secure Port value configured in WSUS in the Port field. By default it is 8531. But it could be 443 or any other port.
4. Base Url is new in Easy2Patch 4.0. This URL is the address used to contact WSUS. It consists of 2 parts.
   * The first part is the portal address of easy2patch 4.0, and the second part is the fixed ConfigMgr.
   * For example: If the address where Easy2Patch is published is e2p.domain.com, <https://e2p.domain.com/ConfigMgr> is written in this field.
5. The connection test is performed by pressing the test button. If the test is successful, a question about saving the record is asked. Yes is clicked.

WSUS Secure Port is the HTTPS port used by the WSUS server. By default, WSUS uses the Secure Port as 8531.

To verify which port the WSUS server is using, you can follow these steps:

1. On the WSUS server, open IIS Manager.&#x20;
2. In the left-hand panel, expand the "Sites" node and click on the "WSUS Administration" site.&#x20;
3. On the page that opens, click on "Bindings" in the "Actions" section on the right.&#x20;
4. In the window that opens, click the "Edit" button next to the port specified as "https" in the "Type" column.&#x20;
5. In the window that opens, in the "Port" field, you can see the WSUS Secure Port number.&#x20;

By following these steps, you can find out the secure port used by the WSUS server.

<figure><img src="/files/OgysFBtImF4iW5Mxgy2w" alt=""><figcaption></figcaption></figure>

## Size limit for WSUS Update Publishing

WSUS server has a maximum size limit. Some update packages may exceed the size limit. When you want to deploy updates larger than 384 MB  You shouldn't do that in general. Updates can't be published to the WSUS server due to the locally published packages size limit. The WSUS package size limit is 382 MB by default.

You can change the default size limitation in 2 ways.

First method is, you can change the maximum file size from registry. When you run the powershell script, maximum file size for publishing updates in wsus changed to 512 MB. Maximum file size for publishing is 2047 MB.

```powershell
[reflection.assembly]::LoadWithPartialName("Microsoft.UpdateServices.Administration")
$wsus = [Microsoft.UpdateServices.Administration.AdminProxy]::GetUpdateServer()
$size = $wsus.GetConfiguration().LocalPublishingMaxCabSize
Write-host "Current Max Size" $size
$config = $wsus.GetConfiguration()
$config.LocalPublishingMaxCabSize = 512
$config.save()
```

You can change this value easily in Easy2Patch Console. Change Local Publishing Max Size (MB) value to 512 and then click submit button.&#x20;


# Intune

Scope: Easy2Patch (Enterprise Licensing)

In order to use the Intune feature, Easy2Patch version 4.0 and Demo or Enterprise license are required. For support on Update and Licensing, please email <support@easy2patch.com>.

[AppRegistration ](/deployment/configuring-intune-application-registration)steps must be completed first for Intune configuration. Access the [App Registrations](https://portal.azure.com/#view/Microsoft_AAD_RegisteredApps/ApplicationsListBlade) page from the Azure portal page. Copy the Application (Client) ID and Directory (tenant) ID values on this screen.

<figure><img src="/files/1DMSqzjyDgyvazYXMaox" alt=""><figcaption><p>App Registrations values</p></figcaption></figure>

<figure><img src="/files/wpl1O5MQy4oQkZApProK" alt=""><figcaption></figcaption></figure>

1. Open **Settings\Connection Settings\Intune** in Easy2Patch.
2. Type or paste the values you copied earlier as indicated below.

<figure><img src="/files/Kfo2hpB2v99AtCb7AEBT" alt=""><figcaption></figcaption></figure>


# Managements


# Role

**Role Management**

Bu ekran, **Easy2Patch** uygulamasına erişecek kullanıcı ve grupların yetkilendirilmesi için kullanılır. Kullanıcılara veya Active Directory gruplarına belirli roller atanarak uygulama içerisindeki erişim yetkileri yönetilebilir.

**Roller**

Easy2Patch aşağıdaki hazır rolleri sunmaktadır:

**Administrator**

Uygulama üzerindeki tüm ayarlara ve yönetim işlemlerine tam yetkiye sahiptir.

**Application Manager**

Uygulama paketlerinin yönetimi ve dağıtım işlemlerini gerçekleştirebilir.

**Intune Manager**

Microsoft Intune ile ilgili yapılandırma ve dağıtım işlemlerini yönetebilir.

**Update Manager**

Güncelleme yönetimi ve yayınlama işlemlerini gerçekleştirebilir.

**Report Operator**

Raporları görüntüleyebilir ve oluşturabilir.

**Read-Only**

Sistemdeki bilgileri görüntüleyebilir ancak herhangi bir değişiklik yapamaz.

<figure><img src="/files/RXu7Xf1Faxpf3Cm8dSul" alt=""><figcaption></figcaption></figure>


# License

Scope: Easy2Patch 4.0

Registration and license key procedures to use Easy2Patch 4.0 software are explained below.

1. Open Easy2Patch web portal from your browser.
2. Login with root or any other Easy2Patch administrator account,

<figure><img src="/files/SgFMwC9mma5PMihCmarA" alt=""><figcaption></figcaption></figure>

3. Go to License under settings page,

<figure><img src="/files/xgWFEjOALk6d9EEFRJXw" alt=""><figcaption></figcaption></figure>

5. Click the **Register Now** button. Fill in the information on the screen and press the Submit button.

<figure><img src="/files/2arAHGr0sHlpETWGvfL9" alt=""><figcaption></figcaption></figure>

6. A verification code consisting of 6-digit numerical values will be sent to the E-Mail address you entered. Enter this code on the screen that will appear on the screen.

<figure><img src="/files/uHV9jLvdhbk9udtJTzod" alt=""><figcaption></figcaption></figure>

7. After this process, the **Request a Demo** button will be activated. When you press this button, an inactive demo license will be created for you. The product key for this license will be contacted by the Easy2Patch team and sent to manually you via e-mail.

<figure><img src="/files/7A2JB9besgkp87TqooHM" alt=""><figcaption></figcaption></figure>

8. Enter the product key sent to you by the Easy2Patch sales team on the screen that appears by pressing the **License Key Confirm** button. The product is ready for use so that all its features can be used for 30 days.

<figure><img src="/files/3LlZlFsAgE0u76aEU074" alt=""><figcaption></figcaption></figure>

<figure><img src="/files/5XSmoLhobWxGzsvTXneK" alt=""><figcaption></figcaption></figure>

{% embed url="<https://www.youtube.com/watch?v=JlCpdkN3Dbo>" %}


# Certificate Management

Scope: Easy2Patch (All versions)

Certificate Management

1. The certificate management screen is opened by going to Settings > General > Certificate Management.
2. Certificates with a wildcard (\*) from the Selected Certificate list are eligible certificates. This certificate is the certificate obtained in the Code signing certificate generation step.
3. Another method of selecting the code signing certificate, if the PFX version of the certificate is available, click the Import Certificate button.
4. On the Open screen, the certificate with the PFX extension is selected and opened,
5. Enter the password of the PFX certificate in the pop-up window and click OK.

Code Signing certificate imported with one of these 2 methods will be the certificate that WSUS software will use. Valid is written in the Certificate Status field, and the validity period of the certificate is written in the Expiration Date field. These areas are shown in green.

<figure><img src="/files/JKdjUL7vdvTrL7vMvmSX" alt=""><figcaption></figcaption></figure>

**Import Certificate** ![](/files/kWgXoB0dwXGonPFpzikc): It is used to import Code-Signing certificate with PFX extension. You need the password of the certificate when importing the PFX file. After the certificate is imported, the configuration must be saved by clicking the save button.

**Generate Self-Signed**![](/files/ntWwTyNpk084GMeAYlOZ): It is used to manually generate the required Code-Signing certificate for WSUS. This certificate needs to be distributed to all client systems manually or via GPO. You can export the certificate with the Export Certificate button. After the certificate is generated, the configuration must be saved by clicking the save button.

**Export Certificate** ![](/files/wNMIDznmV1kMXRmhUcyb): It is used to export the selected and loaded certificate for Code-Signing for backup purposes. When exporting the certificate, a password must be specified as it will be exported together with the private key. It is important that this password is not forgotten. You will need this password during the import process.

## Timestamp Server

A timestamp server, also known as a time-stamping authority (TSA), is a trusted third-party service that provides a digital timestamp to a document, file, or message.

A digital timestamp is a cryptographic hash of the data that is encrypted with a private key owned by the timestamp server. This encrypted hash is then attached to the original data, allowing anyone who has the public key of the timestamp server to verify that the data existed at a specific point in time and has not been altered since then.

The purpose of a timestamp server is to provide a way to prove the integrity and authenticity of electronic records and documents over time, even if the original digital signatures or certificates expire or become invalid. This is especially important in industries such as finance, legal, and healthcare, where records must be kept for long periods of time and need to be verifiable.

Timestamp servers are typically used in conjunction with digital signature software, where a user signs a document using their private key and the timestamp server provides a digital timestamp to the signed document. This ensures that the document was signed at a specific point in time and has not been altered since then.

A desired timestamp server is selected from the Timestamp Server URL list. It is important that this address is accessible. It can be understood that it is accessible by pressing the ping button. Attention, the addresses shown here may not be page addresses that can be opened via browsers. They are services that run over TCP 80 and TCP 443.

{% hint style="info" %}
The computer with SCCM Site Server, WSUS and Easy2Patch installed must have access to the selected timestamp address.
{% endhint %}

<figure><img src="/files/Nu6WrsiLFFXuooCRznVE" alt=""><figcaption></figcaption></figure>

You can any Timestamp server from the list and then click save button. The connection test to the timestamp server can be done with the ping button ![](/files/zKBYxs6WfWyvFYSdq1Mq). Its important that the timestamp server address looks like a web address but a web page may not be published here. Timestamp server is a service that broadcasts on TCP ports 80 or 443.


# Alert Settings

Scope: Easy2Patch (All versions)


# Notification

Scope: Easy2Patch (All versions)

With the rules to be defined on Easy2Patch, important events can be reported to system administrators via e-mail. Also you can send generated reports via e-mail with the configured e-mail server information.


# E-Mail

Scope: Easy2Patch (All versions)

With the rules to be defined on Easy2Patch, important events can be reported to system administrators via e-mail. Detailed configuration steps about E-Mail notifications are explained.

<figure><img src="/files/N04uiFC6Q84sFwqMktDZ" alt=""><figcaption></figcaption></figure>

**Server Name**: SMTP Server name.&#x20;

**TLS**: If the secure channel is to be used, TLS must be checked.

**Port**: TCP port number used by the SMTP server.

**E-Mail**: If authentication is to be used, an e-mail address must be entered as a user name.

**Password**: Password is entered if authentication will be used.

**Authentication**: Specified User should be selected if it is desired to send an E-Mail using authentication. If authentication will not be used, relay right should be given to the server where Easy2Patch is installed on the mail server.

**Sender E-Mail**: If your e-mail server requires a sender e-mail address you can specify here.

**Test E-Mail**: To test the E-Mail server settings, an e-mail address is entered in this field. This address is not saved. It is used for testing purposes only.

The settings are saved by pressing the **save** button.


# Telegram

Scope: Easy2Patch (All versions)

With the rules to be defined on Easy2Patch, important events can be reported to system administrators interactively via telegram. Detailed configuration steps about Telegram are explained. In order to perform these steps, an application can be obtained from "[Telegram for Windows](https://telegram.org/dl/desktop/win64)" or "[Telegram for Linux](https://telegram.org/dl/desktop/linux)". Likewise, mobile applications can be obtained from the "[Google Play Store](https://play.google.com/store/apps/details?id=org.telegram.messenger)" or "[Apple AppStore](https://apps.apple.com/app/telegram-messenger/id686449807)" to receive messages from smartphones.


# Creating a Telegram Bot

Scope: Easy2Patch (All versions)

BotFather is typed into the search field via Telegram and the Start button is pressed on the screen.

<figure><img src="/files/bhPyJmDfjxOYCR4Gi9ux" alt=""><figcaption><p>BotFather</p></figcaption></figure>

<figure><img src="/files/scTdhr2EJtp0tpQvyUWC" alt=""><figcaption><p>Start a bot</p></figcaption></figure>

The /newbot command is used to create a new bot.

* Enter a name for the bot. Ex: Easy2Patch
* Username is determined to access this bot. Username must be unique to you and not in use. Ex: **Easy2Patch\_bot**
* By clicking on the given address or as <http://t.me/Easy2Patch_bot>, you can go to the telegram address with your username. With this bot, you can share this address with the people you want to receive Easy2Patch alerts.
* After going to this address, the bot is started by pressing the Start button.

After the bot name is entered, the bot creation process is completed. With this process, the API Key created specifically for your bot is displayed on the screen. If you want to see the API Key value of the bot again later, you can use the **/mybots** command in the BotFather bot.

The API Key consists of a numeric value followed by an alpha-numeric expression separated by a ":" "colon".

ex: 1234567890:AAGhW0VD8k8a-dXbcht38rzS5fU5YQqWQ2A

This value is the address you will write in the API Key field in Easy2Patch Telegram settings.


# Telegram Chat ID

Scope: Easy2Patch (All versions)

As many people as you want can join the Telegram Bot you created in the previous article. Each participant will have a different ChatID. This ChatID value is personal and shows the Telegram address to be written for the recipients in the Alerts field.

In Telegram, you can go to the "Telegram Bot Raw" bot with the help of search. This bot is the bot that will show your Telegram information. While on this bot, the /start command is written.

The value in the Chat id field is the value created specifically for the person and is used as the Telegram address of the person in the recipients section.

<figure><img src="/files/kP5FTVnOAiONUBZjcBPL" alt=""><figcaption><p>Chat ID</p></figcaption></figure>


# Telegram Setting

Scope: Easy2Patch 4.0

After you create telegram API Key and Chat ID, you can insert this information to Telegram screen.

1. Click Add Telegram,
2. Enter your API Key,
3. Enter your Chat ID,
4. Click test for send a test message,
5. Click Save button for saving Telegram information.

<figure><img src="/files/qboHV2sCN0jHzoMIbTy9" alt=""><figcaption></figcaption></figure>


# Alerts

<figure><img src="/files/tzbgjAk168wggGFt9BVf" alt=""><figcaption></figcaption></figure>

**Alert Management**

Bu ekran, **Easy2Patch** üzerinde oluşan önemli olaylar için bildirim (Alert) oluşturmak ve yönetmek amacıyla kullanılır. Tanımlanan alarmlar sayesinde belirli olaylar gerçekleştiğinde seçilen alıcılara e-posta veya diğer bildirim kanalları üzerinden otomatik bildirim gönderilebilir.

&#x20;

**New Alert**

Yeni bir alarm kuralı oluşturmak için kullanılır. Oluşturulan alarm, belirlenen olay gerçekleştiğinde otomatik olarak tetiklenir.

**Recipients**

Bildirim gönderilecek kullanıcıların veya alıcı gruplarının yönetildiği ekrandır. Alarm oluşturulmadan önce alıcıların tanımlanmış olması önerilir.

**Clear Alerts Cache**

Alarm önbelleğini temizler. Yapılan değişikliklerin sistem tarafından yeniden okunmasını ve güncel alarm yapılandırmalarının uygulanmasını sağlar.

&#x20;

**Status**

Alarmın aktif veya pasif olduğunu gösterir.

* **Aktif:** Alarm çalışır ve ilgili olay gerçekleştiğinde bildirim gönderilir.
* **Pasif:** Alarm tanımlı olsa da bildirim oluşturulmaz.

**Event**

Alarmın hangi olay için tetikleneceğini gösterir.

Örnek olaylar:

* Update/Application Published Successfully
* Failed to Publish Application
* Catalog Download Event
* Defender Detect Event

**Event Detail**

Seçilen olayın detayını gösterir.

**Recipients**

Alarm gerçekleştiğinde bildirimin gönderileceği kullanıcı veya kullanıcı grubunu gösterir.

**Alarm Channels**

Bildirimin hangi kanal üzerinden gönderileceğini gösterir.

Örnek:

* **Send an Email**

**Actions**

Her alarm satırı için aşağıdaki işlemler gerçekleştirilebilir:

* **Edit:** Mevcut alarm yapılandırmasını düzenler.
* **Delete:** Alarmı sistemden siler.

&#x20;


# Recipients


# Managing Easy2Patch

Scope: Easy2Patch (All versions)


# Easy2Patch 3.1


---

[Next Page](/llms-full.txt/1)